Introduction
The ZS HTML Email Task from ZappySys SSIS PowerPack enables you to create and send custom HTML emails directly from SSIS. By incorporating CSS styles, tables, and dynamic variables, you can automatically deliver highly formatted, professional reports.
In this tutorial, we’ll demonstrate how to use CSS styles in the ZS HTML Email Task to format tables and how to use variables for dynamic content, enabling personalized, visually appealing emails.
Prerequisites
- Download and install the ZappySys SSIS PowerPack.
- Knowledge of HTML and CSS
Steps
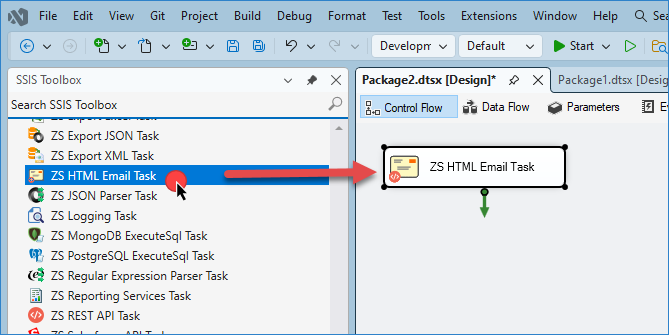
-
Drag and drop the HTML Email Task, then double-click it to open the configuration window.
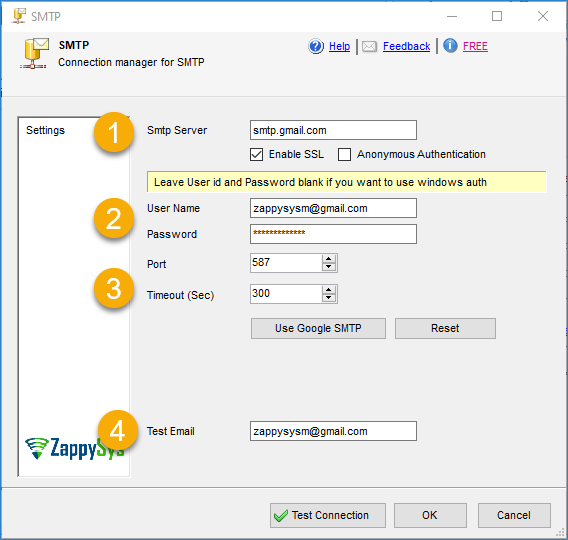
-
Create a new SMTP connection and enter the required fields such as SMTP server, credentials, port, and test email.
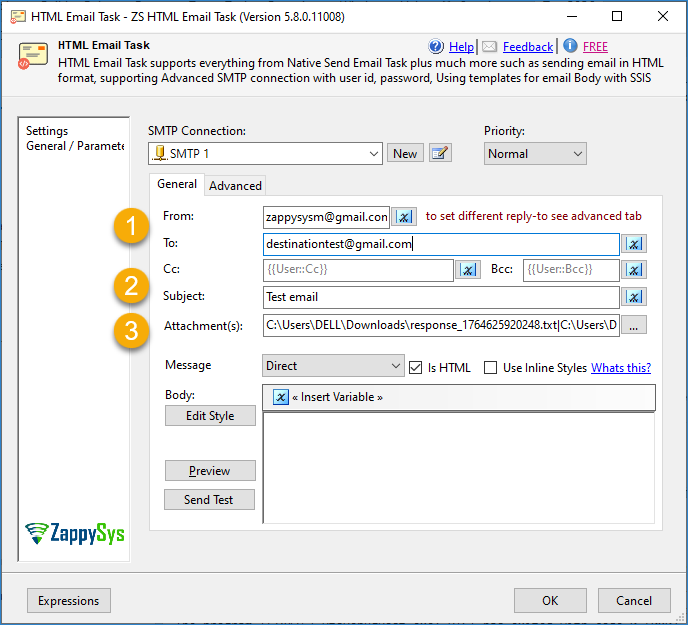
-
Enter the email details, including From, To, Subject, additional properties, and attachments. If you need to send more than one file, refer to this article.
-
Now, in the email body, we will show examples using CSS.
Example 1: Dynamic Tables with Variables and Multiple Styles
In this example, we will demonstrate how to apply three different CSS styles to format tables within a single email. This approach is practical when sending reports with multiple sections, such as sales, inventory, or customer data.
- Add a table to the body. You can use the following example and assign a class to the
<table>element using a variable:
"`html
Example
| Name | Country | Orders |
|---|---|---|
| Acme Corp | USA | 145 |
| Blue Sky Ltd | UK | 112 |
| NovaTech | Canada | 98 |
-
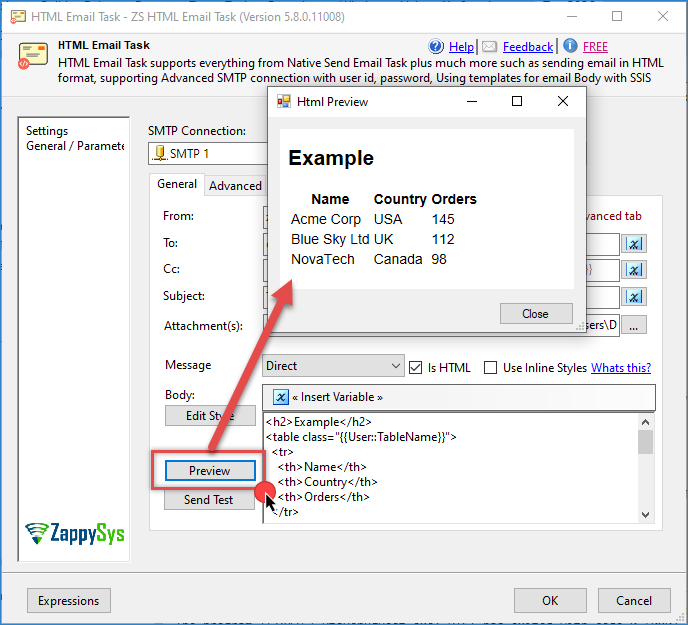
If you preview the table now, you’ll see a plain, unstyled table.
-
Add CSS styles for the three different table designs. In the Edit Style section, enter the following CSS:
"`html
body {
font-family: Arial, sans-serif;
color: #333;
background-color: #fafafa;
padding: 20px;
}
h1 {
text-align: center;
color: #2E8B57;
}
h2 {
color: #444;
margin-top: 25px;
}
/* --------------------------------------------------
STYLE 1: Green Minimalist
-------------------------------------------------- */
.example-table-1 {
width: 100%;
border-collapse: collapse;
font-size: 16px;
background-color: white;
}
.example-table-1 th {
background: #2E8B57;
color: white;
padding: 12px;
text-align: left;
font-weight: bold;
}
.example-table-1 td {
border: 1px solid #ccc;
padding: 10px;
}
.example-table-1 tr:nth-child(even) {
background-color: #f5f5f5;
}
/* --------------------------------------------------
STYLE 2: Modern Blue with Hover & Shadow
-------------------------------------------------- */
.example-table-2 {
width: 80%;
border-collapse: separate;
border-spacing: 0;
margin-top: 10px;
font-size: 18px;
background: white;
box-shadow: 0 2px 8px rgba(0,0,0,0.15);
border-radius: 8px;
overflow: hidden;
}
.example-table-2 th {
background-color: #1E90FF;
color: white;
padding: 14px;
text-align: center;
font-family: “Segoe UI”, sans-serif;
}
.example-table-2 td {
border-bottom: 1px solid #ddd;
padding: 12px;
text-align: center;
}
.example-table-2 tr:hover {
background-color: #E0F0FF;
cursor: pointer;
}
/* --------------------------------------------------
STYLE 3: Retro Orange Theme
-------------------------------------------------- */
.example-table-3 {
border: 3px solid #FFA500;
width: 50%;
border-collapse: collapse;
margin-top: 10px;
font-family: “Courier New”, monospace;
font-size: 15px;
background-color: #FFF5E0;
}
.example-table-3 th {
background-color: #FFA500;
color: #fff;
padding: 10px;
letter-spacing: 1px;
text-transform: uppercase;
}
.example-table-3 td {
border: 1px solid #FFA500;
padding: 8px;
}
.example-table-3 tr:nth-child(odd) {
background-color: #FFF8E1;
}

3. From the CSS above, you now have three available table styles. Set the variable `User::TableName` to one of the following values to apply the chosen style:
* `example-table-1`
* `example-table-2`
* `example-table-3`
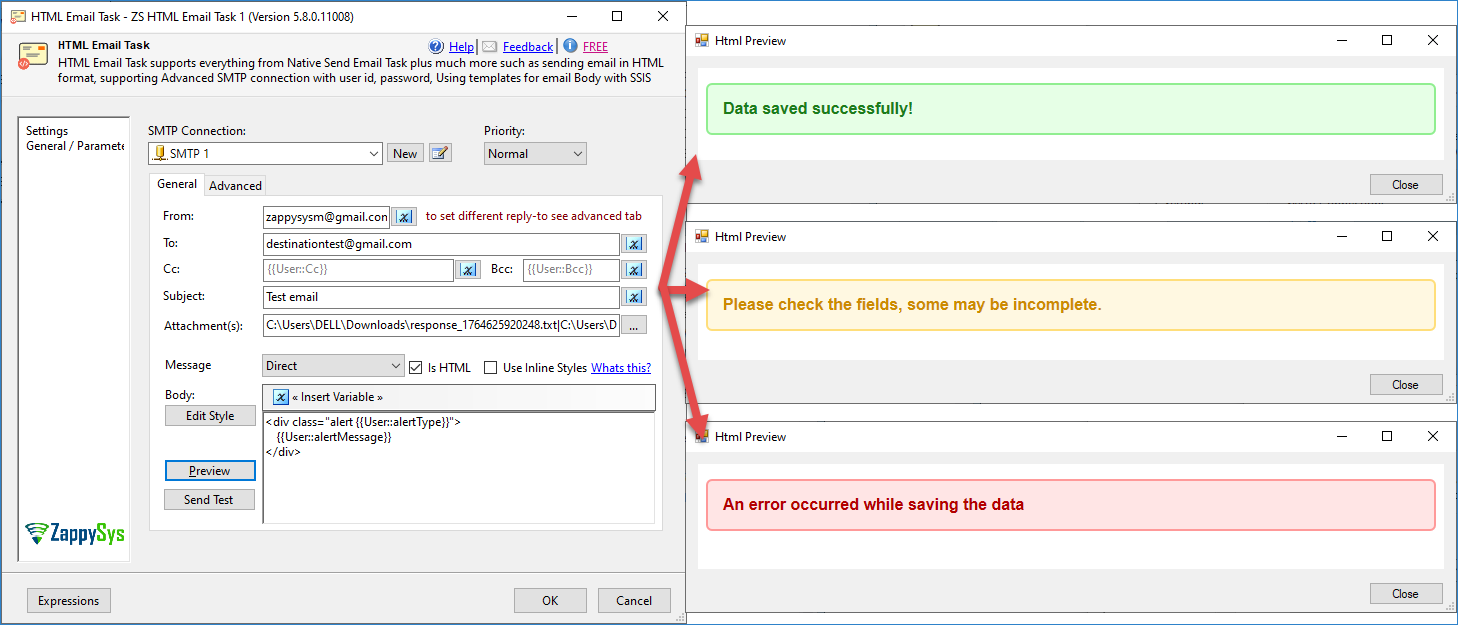
4. When you click **Preview**, the table’s appearance will change based on the `User::TableName` variable value.

Example 2: Different Message Depending on the Success of an Action
------------------------------------------------------------------------------------------------------------------
We will create success, warning, and failure alerts. A variable determines the alert type(`{{User::alertType}}`), and another variable defines the alert message(`{{User::alertMessage}}`).
Here are the example values we will use for this example:
alertType = ‘alert-error’;
alertMessage = ‘An error occurred while saving the data.’;
alertType = ‘alert-warning’;
alertMessage = ‘Please check the fields, some may be incomplete.’;
alertType = ‘alert-success’;
alertMessage = ‘Data saved successfully!’;
1. In the body, use this example with two variables: one for the alert type and another for the alert message:
- Add the following CSS to define styles for each alert type:
/* Base alert box */
.alert {
  padding: 15px;
  border-radius: 6px;
  margin: 15px 0;
  font-family: Arial, sans-serif;
  font-size: 16px;
  font-weight: bold;
}

/* Error message */
.alert-error {
  background-color: #ffe5e5;
  color: #b30000;
  border: 2px solid #ff9999;
}

/* Warning message */
.alert-warning {
  background-color: #fff8e1;
  color: #cc8b00;
  border: 2px solid #ffde7a;
}

/* Success message */
.alert-success {
  background-color: #e6ffe6;
  color: #1b7d1b;
  border: 2px solid #90ee90;
}
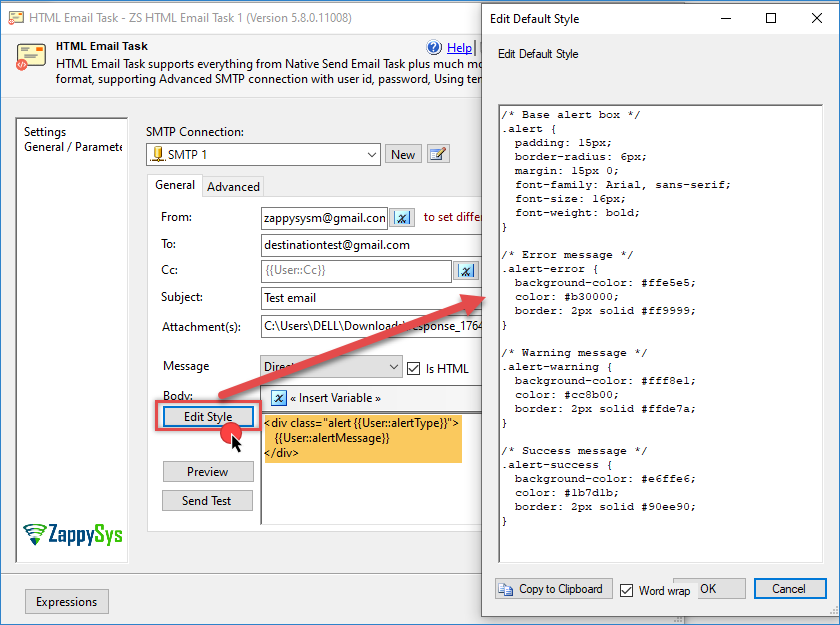
- Now, depending on the alert type, the CSS will adjust automatically. Below are the three visual variations based on the variable values:
Using Variables in Style
Suppose you need to include dynamic content in both the table structure and style, insert the style tags directly in the Body of the email. This is especially useful when layout or behavior must change based on conditions or inputs.
"`html
.{{User::DynamicClass}} { /* Styles go here */ }
This method allows the CSS class to change dynamically using SSIS variables.
Conclusion
------------------------------------------------------------------------------------------------------------------
ZS HTML Email Task, combined with CSS styling and dynamic variables, allows you to create sophisticated, professional-looking emails that adapt automatically to your requirements. You can design anything from simple static tables to complex, variable-driven reports. The flexibility provided by ZS HTML Email Task enables you to automate and format emails for improved readability and presentation.
Explore our [SSIS PowerPack](https://zappysys.com/) for more information and [download and install it](https://zappysys.com/products/ssis-powerpack/download/) to start building smarter, faster, and more scalable solutions.
References
------------------------------------------------------------------------------------------------------------------
* [Send HTML Email Task](https://zappysys.com/products/ssis-powerpack/ssis-send-html-email-task/)
* [Send HTML Email Task documentation](https://zappysys.com/onlinehelp/ssis-powerpack/index.htm#page=send-html-email-task.htm)
* [Blog articles](https://zappysys.com/blog/category/ssis/components/ssis-html-table-source/)
* [SSIS PowerPack](https://zappysys.com/products/ssis-powerpack/)
Contact us
------------------------------------------------------------------------------------------------------------------
If you encounter any issues or have specific questions, reach out to our [support team](https://zappysys.com/support) via live chat or submit a support ticket using our email: [support@zappysys.com](mailto:support@zappysys.com).