This article explains how to upload files in Azure File Shares (not Blob Storage) using the ZappySys REST API Task in SSIS. It also covers how to generate SAS tokens and construct the appropriate REST API URL for accessing the files.
What is Azure Files?
Azure Files offers fully managed file shares in the cloud that are accessible via the industry standard Server Message Block (SMB) protocol, Network File System (NFS) protocol, and Azure Files REST API. Azure file shares can be mounted concurrently by cloud or on-premises deployments. SMB Azure file shares are accessible from Windows, Linux, and macOS clients. NFS Azure file shares are accessible from Linux clients. Additionally, SMB Azure file shares can be cached on Windows servers with Azure File Sync for fast access near where the data is being used.
Prerequisites
- SSIS installed
- Download and install the ZappySys SSIS PowerPack.
- Azure Storage account with a File Share created
Generate SAS Token for Azure File Share
To authenticate REST API requests, generate a Shared Access Signature (SAS) token with required permissions.
Steps:
- Go to Azure Portal > Storage Accounts > [Your Account] > File shares.
- Click Shared access signature in the left menu.
- Select:
- Allowed services: File
- Allowed resource types: Service, Container, Object
- Allowed permissions: Read, Write, List, Create, Delete
- Set expiry time (UTC).
- Click Generate SAS and connection string.
- Copy the SAS Token (starting with
?sv=...).
Build Azure File Share REST API URL
To upload a file, construct the REST API URL using the storage account name <storage-account-name>, file share <share-name>, file path <directory>, file name <file-name>, and SAS token <sas-token>. This URL is used in the ZappySys REST API Task to perform a GET request and retrieve the file from Azure File Share to your local system.
Format:
- To create the file placeholder
https://<storage-account-name>.file.core.windows.net/<share-name>/<directory>/<file-name>?<sas-token> - To upload the file content using a range PUT
https://<storage-account-name>.file.core.windows.net/<share-name>/<directory>/<file-name>?comp=range&<sas-token>
Example:
- To create the file placeholder:
https://mystorageacct.file.core.windows.net/myshare/dir1/myfile.zip?<sas-token> - To upload the file content using a range PUT
https://mystorageacct.file.core.windows.net/myshare/dir1/myfile.zip?comp=range&<sas-token>
Upload File in Azure File Share
To upload a file to Azure File Share using ZappySys REST API Task, you need to first create the file on Azure and then write the file content using a range-based PUT request. By using SSIS variables, you can dynamically build the target path, file name, and authentication token, making your upload process flexible and reusable.
Let’s Create Required SSIS Variables
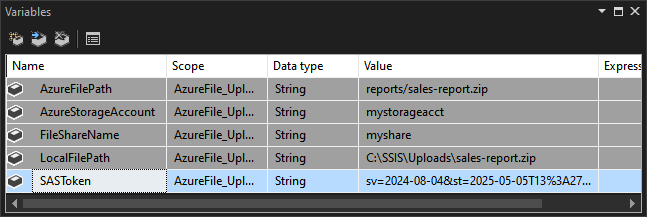
Before we upload the file from Azure File Share, let’s define a few SSIS variables to store the storage account name, file path, file name, and SAS token. These variables will help us build the upload URL dynamically and make the package more flexible and reusable. In your SSIS package, create the following variables:
| Variable Name | Type | Example Value |
|---|---|---|
AzureStorageAccount |
String | mystorageacct |
FileShareName |
String | myshare |
AzureFilePath |
String | reports/sales-report.zip |
SASToken |
String | sv=2024-08-04&st=2025-05-05&se=xx&sr=s&sp=rl&... |
LocalFilePath |
String | C:\SSIS\Uploads\sales-report.zip |
Uploading Files using ZappySys REST API Task
Uploading a file to Azure File Share using ZappySys involves two main REST calls:
- Create the file placeholder
- Upload the file content using a range PUT
We’ll use SSIS variables to construct the file path and pass the SAS token dynamically.
Step-1: Add a Sequence Container
-
In the Control Flow tab, drag a Sequence Container.
-
Rename it:
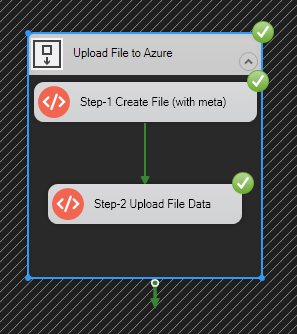
Upload File to Azure(optional) -
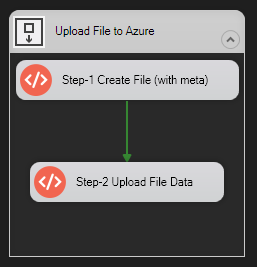
Inside the Sequence Container (named
Upload File to Azure), you’ll need to add two ZappySys REST API Tasks — one to create the file and one to upload the file content. In the next section, we’ll show you how to drag and drop the REST API tasks and configure each one with the correct URL, headers, and file options.
Step-2: Create File in Azure File Share (Initial PUT)
-
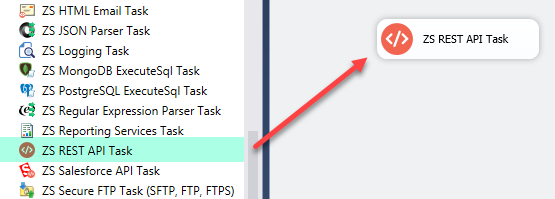
Inside the Sequence Container (named
Upload File to Azure), Drag and drop REST API Task from the SSIS Toolbox into the Control Flow.
-
Rename it to:
Step-1 Create File (with meta)(optional) -
Double-click the task to open its editor.
-
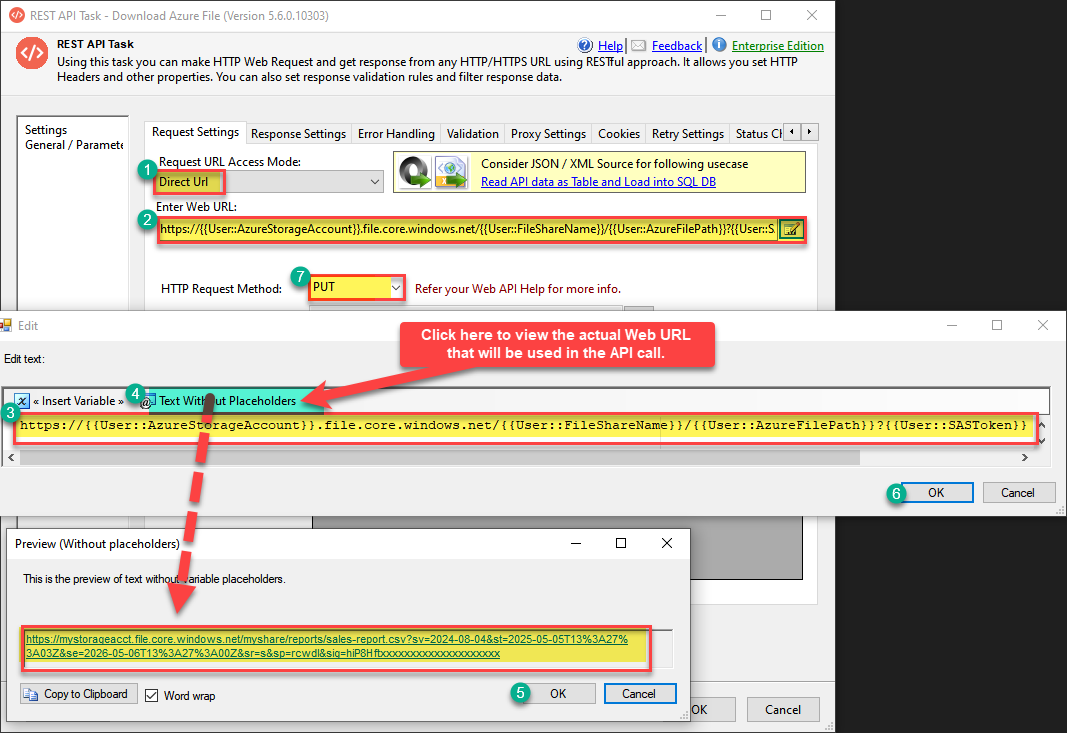
In the ZappySys REST API Task, set the following:
4.1 Access Mode:Direct URL
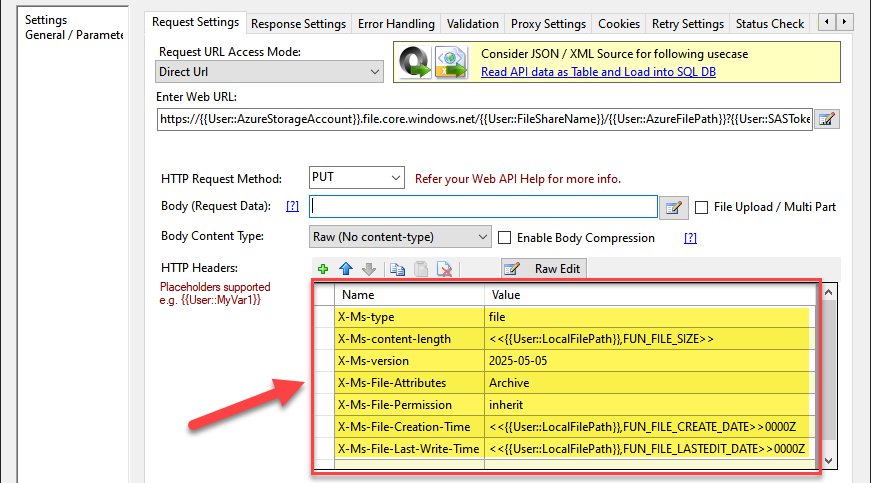
4.2 Web URL: Set to the variable-based dynamic URLhttps://{{User::AzureStorageAccount}}.file.core.windows.net/{{User::FileShareName}}/{{User::AzureFilePath}}?{{User::SASToken}}4.3 HTTP Request Method:
PUTPlease refer to the steps shown in the image below for guidance.
For guidance on creating a dynamic URL in your API calls, please refer to this article: How to make Path / URL dynamic in SSIS
-
Here’s how to set the required HTTP headers in the ZappySys REST API Task when uploading a file to Azure File Share, using dynamic values for file size, creation time, and last modified time based on the local file (
User::LocalFilePath):Go to the HTTP Headers section, remove all default headers, and add the following header.
For more details, you can refer to this help link: Azure Files REST API
Required HTTP Headers (for File Creation Request)
Header Name Value x-ms-typefilex-ms-content-length<<{{User::LocalFilePath}},FUN_FILE_SIZE>>x-ms-version2025-05-05x-ms-file-attributesArchivex-ms-file-permissioninheritx-ms-file-creation-time<<{{User::LocalFilePath}},FUN_FILE_CREATE_DATE>>0000Zx-ms-file-last-write-time<<{{User::LocalFilePath}},FUN_FILE_LASTEDIT_DATE>>0000ZExplanation of Placeholders
These special functions are supported by ZappySys REST API Task to extract file metadata automatically at runtime. For more details, you can refer to this help link: Format Specifiers / Placeholder Functions
<<{{User::LocalFilePath}},FUN_FILE_SIZE>>: Gets the file size in bytes<<{{User::LocalFilePath}},FUN_FILE_CREATE_DATE>>: Gets file creation time in ISO format (e.g.2024-12-01T10:23:00)<<{{User::LocalFilePath}},FUN_FILE_LASTEDIT_DATE>>: Gets last modified time in ISO format- Append
0000Zto match Azure File Share timestamp formatting
-
No request body is needed for this step.
-
That’s it! Click OK to save the settings.
Step-3: Upload File Content in Azure File Share (PUT with Range)
-
Inside the Sequence Container (named
Upload File to Azure), Drag and drop another REST API Task. -
Rename it to:
Step-2 Upload File Data(optional) -
Double-click the task to open its editor.
-
In the ZappySys REST API Task, set the following:
4.1 Access Mode:
Direct URL4.2 Web URL: Set to the variable-based dynamic URL
https://{{User::AzureStorageAccount}}.file.core.windows.net/{{User::FileShareName}}/{{User::AzureFilePath}}?comp=range&{{User::SASToken}}4.3 HTTP Request Method:
PUT4.4 Body:
@{{User::LocalFilePath}}
ZappySys will automatically read the file specified in the variableUser::LocalFilePathand stream it to Azure as part of the PUT request.4.5
✅Check File Upload / Multi part
Enable this option to indicate that the request body contains a binary data.4.6 Go to the HTTP Headers section, remove all default headers, and add the following header. For more details, you can refer to this help link: Azure Files REST API
Required HTTP Headers (for File Creation Request)
Header Name Value x-ms-version2025-05-05x-ms-writeupdatePlease refer to the steps shown in the image below for guidance.
-
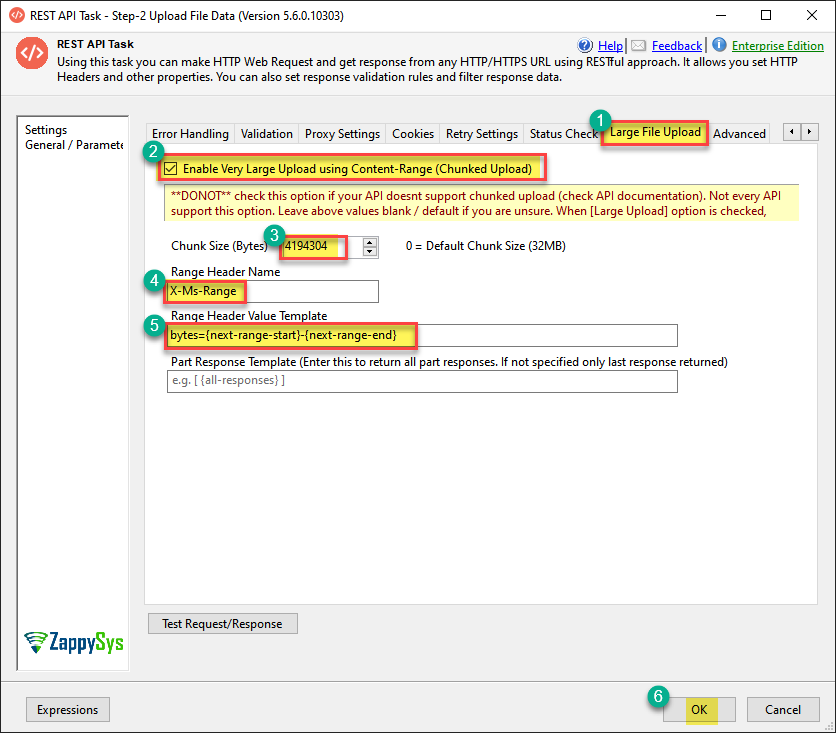
Azure File Share requires that file data be uploaded in chunks of up to 4 MiB (4,194,304 bytes) per request. To configure this in ZappySys REST API Task:
5.1 Go to the Large File Upload tab
5.2✅Enable very large upload using content-range (chunked upload)
5.3 Set Chunk Size (Bytes) to4194304(i.e., 4 MiB)
5.4 Set Range Header Name tox-ms-range
5.5 Set Range Header Value Template to:bytes={next-range-start}-{next-range-end}This ensures the file is broken into proper chunks and sent with the required Azure range format during upload.
-
That’s it! Click OK to save the settings.

Once all tasks are configured, execute the SSIS package. This will trigger the REST API calls to first create the file and then upload its contents to the specified Azure File Share path. If successful, your file should appear in the target directory with correct metadata and content.
Related: How to Download Files from Azure File Shares
If you’re looking to download files instead of uploading, check out our companion guide:
https://community.zappysys.com/t/how-to-download-files-from-azure-file-shares-not-blob-storage/530
References
- ZappySys SSIS REST API Task
- Azure Files REST API
- Server Message Block (SMB) protocol
- Network File System (NFS) protocol
Conclusion
In this guide, we’ve walked through the steps to upload files in Azure File Shares using the ZappySys REST API Task in SSIS. By leveraging SSIS variables, chunked upload settings, and proper HTTP headers, you can handle large files efficiently and ensure Azure requirements are met. This method is ideal for integrating cloud file operations into your ETL workflows with full control and reliability.