This article explains how to download files from Azure File Shares (not Blob Storage) using the ZappySys REST API Task in SSIS. It also covers how to generate SAS tokens and construct the appropriate REST API URL for accessing the files.
What is Azure Files?
Azure Files offers fully managed file shares in the cloud that are accessible via the industry standard Server Message Block (SMB) protocol, Network File System (NFS) protocol, and Azure Files REST API. Azure file shares can be mounted concurrently by cloud or on-premises deployments. SMB Azure file shares are accessible from Windows, Linux, and macOS clients. NFS Azure file shares are accessible from Linux clients. Additionally, SMB Azure file shares can be cached on Windows servers with Azure File Sync for fast access near where the data is being used.
Prerequisites
- SSIS installed
- Download and install the ZappySys SSIS PowerPack.
- Azure Storage account with a File Share created
Generate SAS Token for Azure File Share
To authenticate REST API requests, generate a Shared Access Signature (SAS) token with required permissions.
Steps:
- Go to Azure Portal > Storage Accounts > [Your Account] > File shares.
- Click Shared access signature in the left menu.
- Select:
- Allowed services: File
- Allowed resource types: Service, Container, Object
- Allowed permissions: Read, Write, List, Create, Delete
- Set expiry time (UTC).
- Click Generate SAS and connection string.
- Copy the SAS Token (starting with
?sv=...).
Build Azure File Share REST API URL
To download a file, construct the REST API URL using the storage account name <storage-account-name>, file share <share-name>, file path <directory>, file name <file-name>, and SAS token <sas-token>. This URL is used in the ZappySys REST API Task to perform a GET request and retrieve the file from Azure File Share to your local system.
Format:
https://<storage-account-name>.file.core.windows.net/<share-name>/<directory>/<file-name>?<sas-token>
Download Example URL:
https://mystorageacct.file.core.windows.net/myshare/dir1/myfile.zip?<sas-token>
Download File from Azure File Share
Let’s walk through how to download a file from Azure File Share using the ZappySys REST API Task. With a simple GET request and the correct SAS URL, you can easily retrieve the file and save it locally—no coding required.
Let’s Create Required SSIS Variables
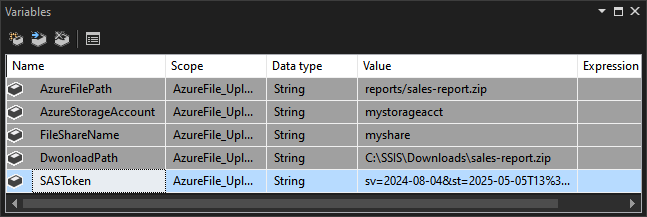
Before we download the file from Azure File Share, let’s define a few SSIS variables to store the storage account name, file path, file name, and SAS token. These variables will help us build the download URL dynamically and make the package more flexible and reusable. In your SSIS package, create the following variables:
| Variable Name | Type | Example Value |
|---|---|---|
AzureStorageAccount |
String | mystorageacct |
FileShareName |
String | myshare |
AzureFilePath |
String | reports/sales-report.zip |
SASToken |
String | sv=2024-08-04&st=2025-05-05&se=xx&sr=s&sp=rl&... |
DownloadPath |
String | C:\SSIS\Downloads\sales-report.zip |
Downloading Files using ZappySys REST API Task
Here’s how to configure the ZappySys REST API Task to download a file from Azure File Shares:
-
Drag REST API Task from the SSIS Toolbox into the Control Flow.
-
Rename it to:
Download Azure File(optional) -
Double-click the task to open its editor.
-
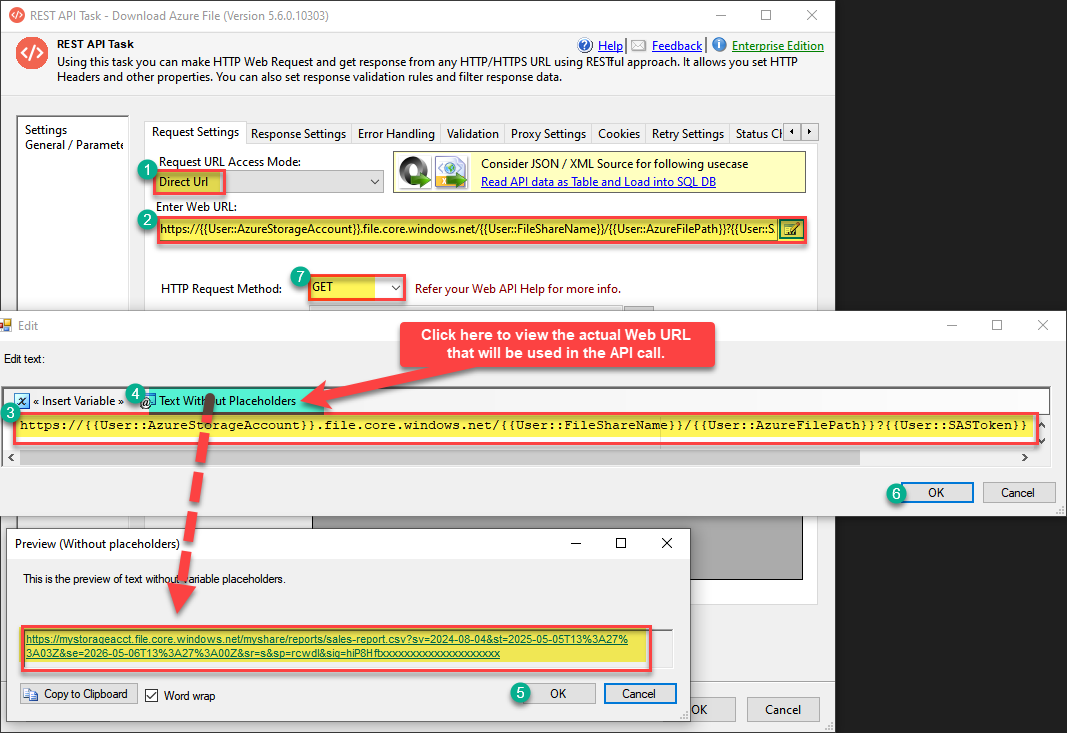
In the ZappySys REST API Task, set the following:
- Access Mode:
Direct URL - Web URL: Set to the variable-based dynamic URL
https://{{User::AzureStorageAccount}}.file.core.windows.net/{{User::FileShareName}}/{{User::AzureFilePath}}?{{User::SASToken}}- HTTP Request Method:
PUT
Please refer to the steps shown in the image below for guidance.
For guidance on creating a dynamic URL in your API calls, please refer to this article: How to make Path / URL dynamic in SSIS
- Access Mode:
-
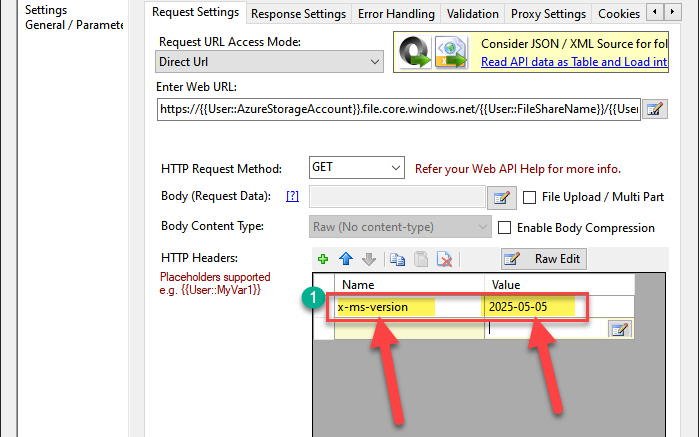
Go to the HTTP Headers section, remove all default headers, and add the following header.
For more details, you can refer to this help link: Get Filex-ms-version:2025-05-05
-
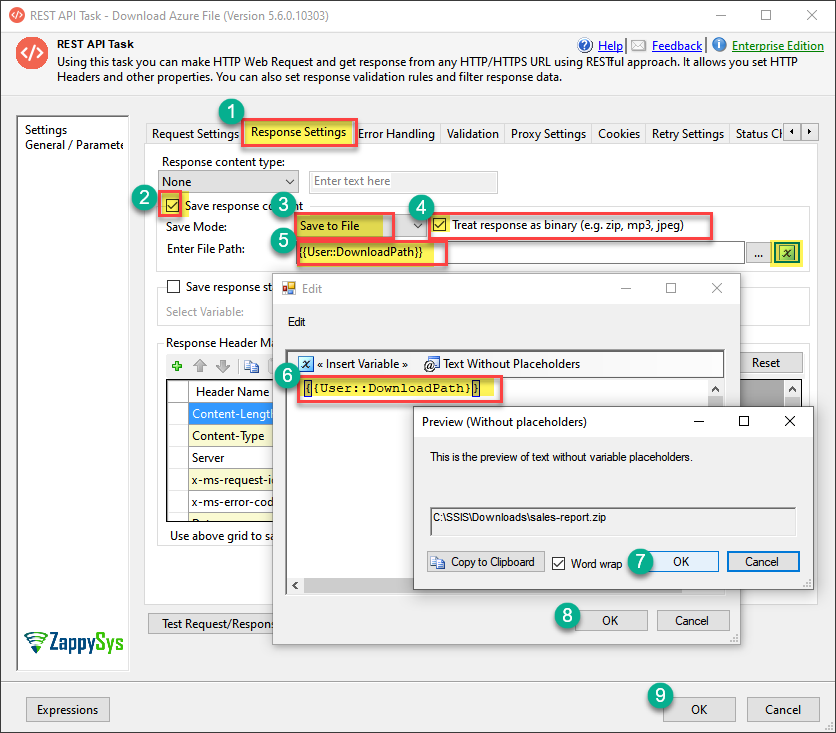
Configure the Response Settings tab as follows:
✅Check Save Response Content- Set Save Mode to
Save to File ✅Check Treat Response as Binary- In the File Path field, specify where you want to save the downloaded file.
In our case, we’ve configured the path using a variable, so set it to the{{User::DownloadPath}}variable.
-
That’s it! Click OK to save the settings, then run the package to test it. This will make the API call and download the file to the specified local path.

References
- ZappySys SSIS REST API Task
- Azure Files REST API
- Server Message Block (SMB) protocol
- Network File System (NFS) protocol
Conclusion
In this guide, we’ve walked through the steps to download files from Azure File Shares using the ZappySys REST API Task in SSIS. By leveraging SSIS variables for dynamic URL construction and configuring the REST API Task for GET requests, we can easily retrieve files from Azure File Shares and store them locally. This approach eliminates the need for complex coding and makes the process more efficient and manageable within SSIS. With the knowledge gained, you can now seamlessly integrate Azure File Share downloads into your SSIS workflows.