Uninstall the SSIS from Visual Studio
SQL Server Integration Services (SSIS) is a powerful tool for data integration and ETL processes. However, there may be instances where you need to remove it from your Visual Studio environment. This guide outlines the steps involved in uninstalling SSIS, providing both a straightforward method using the Extension Manager and a manual approach for more complex scenarios.
Method 1: Using Visual Studio’s Extension Manager
- Open Visual Studio: Launch your Visual Studio IDE.
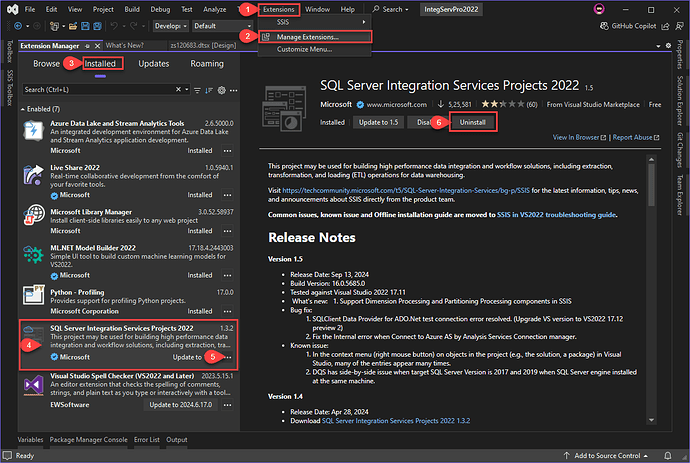
- Access Extension Manager: Go to Extensions > Manage Extensions….
- Locate SSIS Extension: In the Installed tab, find “SQL Server Integration Services Projects”.
- Uninstall: By using uninstall button
- Confirm: Confirm the uninstallation process.
Method 2: Manual Removal (If Method 1 Fails)
Warning: Manual removal requires caution and technical knowledge. Incorrect modifications can lead to instability.
- Close Visual Studio: Ensure that Visual Studio is completely closed.
- Locate the SSIS Folder: Navigate to the following directory:
- VS 2022:
C:\Program Files\Microsoft Visual Studio\2022\<Edition>\Common7\IDE\CommonExtensions\Microsoft\SSIS - Other VS Versions: The path might vary, but it’s usually under the Visual Studio installation directory.
- Delete the Folder: Carefully delete the entire “SSIS” folder.
- Restart Visual Studio: Launch Visual Studio to verify the complete removal of SSIS.
Additional Considerations
- SQL Server Installation: If you’ve installed SQL Server with SSIS components, uninstalling the SSIS extension from Visual Studio won’t remove the SQL Server components. You’ll need to use the SQL Server Installation Center to remove SSIS components from SQL Server.
- Third-Party Extensions: If you have third-party extensions related to SSIS, uninstalling them separately might be necessary.
Conclusion
By following the provided steps, you can successfully uninstall SQL Server Integration Services (SSIS) from your Visual Studio environment, ensuring a streamlined development experience.
