Microsoft Teams provides powerful APIs through Microsoft Graph that allow integration with various applications, including SSIS (SQL Server Integration Services). This guide will walk you through the process of sending a One on One message on Teams using SSIS.
Prerequisites
Before you begin, ensure you have the following:
- OAuth Connection Manager Configuration
- OAuth Version
- OAuth Grant Type
- Client ID
- Client Secret
- Authorization URL
- Access Token URL
- Scopes/PermissionsConfigure these details in SSIS OAuth Connection Manager to authenticate with Microsoft Graph API.
To create an Azure AD app and configure it with the required permissions and secrets, follow these steps:
1. Create an Azure AD App Registration
- Navigate to Azure AD Portal:
- Go to the Azure portal at https://portal.azure.com.
- Navigate to Azure Active Directory.
- Register an Application:
- Go to App registrations (under Manage).
- Click on New registration.
- Enter a name for your application (e.g., “MyChatApp”).
- Choose appropriate Supported account types (e.g., Accounts in this organizational directory only).
- Set a valid redirect URI if needed (not necessary for this scenario).
- Register the Application:
- Click Register to create the application.
2. Configure API Permissions
- Add Required API Permissions:
- In your newly created application, go to API permissions.
- Click on Add a permission.
- Select Microsoft Graph:
- Choose Microsoft Graph.
- Select Delegated permissions.
- Add Required Permissions:
- Search for each permission and add them one by one:
Channel.ReadBasic.AllChat.ReadChat.ReadWriteChatMessage.ReadChatMessage.SendTeam.ReadBasic.AllUser.ReadBasic.All
- Grant Admin Consent:
- After adding all permissions, click on Grant admin consent for [your tenant] to consent to these permissions for all users in the organization.
3. Create Client Secrets
- Generate a Client Secret:
- In your application, go to Certificates & secrets.
- Under Client secrets, click on New client secret.
- Enter a description, select an expiry period, and click Add.
- Important: Note down the secret value immediately. This secret will be displayed only once.
- Store the Secret Securely:
- Copy the secret value to a secure location. You’ll need it to authenticate your app programmatically.
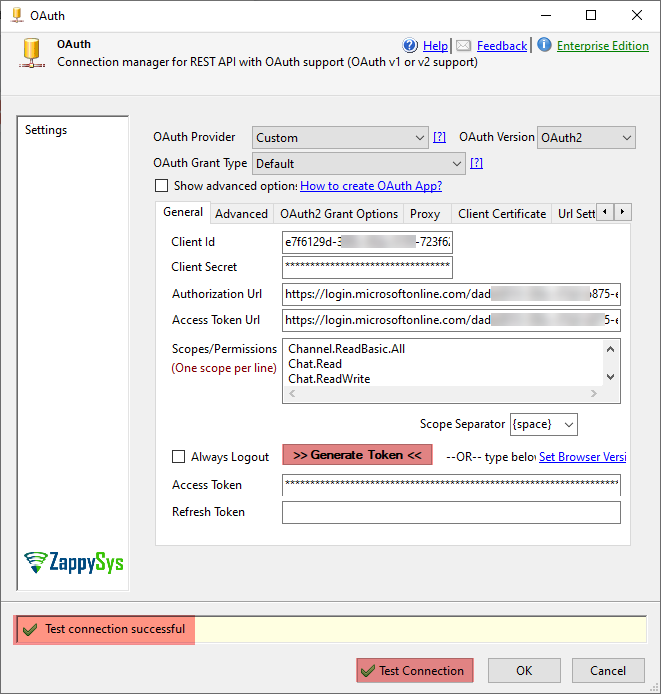
Configure the OAuth Connection Manager:
Right-click on the Connection Manager Pane, and Select ZS-OAuth Connection Manager, and configure all these properties:
- OAuth Version
- OAuth Grant Type
- Client ID
- Client Secret
- Authorization URL
- Access Token URL
- Scopes/PermissionsConfigure these details in SSIS OAuth Connection Manager to authenticate with Microsoft Graph API
Below is a sample screenshot of it.
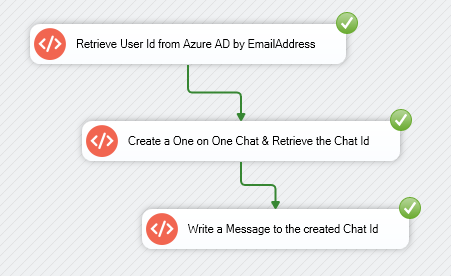
Send Message on Teams to the User by EmailAddress:
Step 1: Retrieve User ID from Azure AD by Email Address
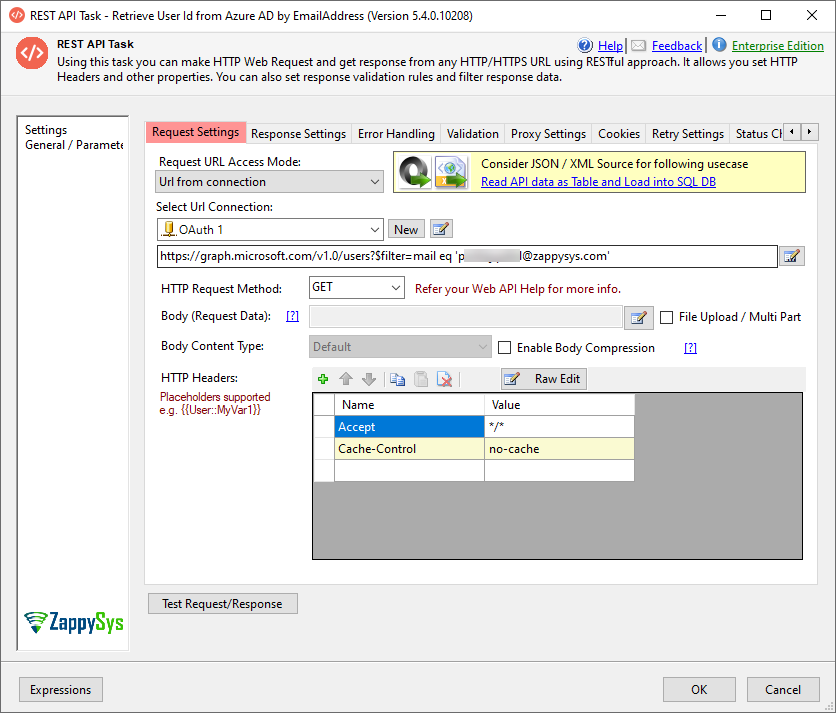
Drag-and-drop the REST API Task from the SSIS Toolbox and double-click on it to configure the properties.
- Set up REST API Task:
- Request URL Access Mode: Url from Connection
- Select Url Connection: Choose your configured OAuth connection.
- Request URL:
https://graph.microsoft.com/v1.0/users?$filter=mail eq 'demo.user@zappysys.com' - HTTP Request Method: GET
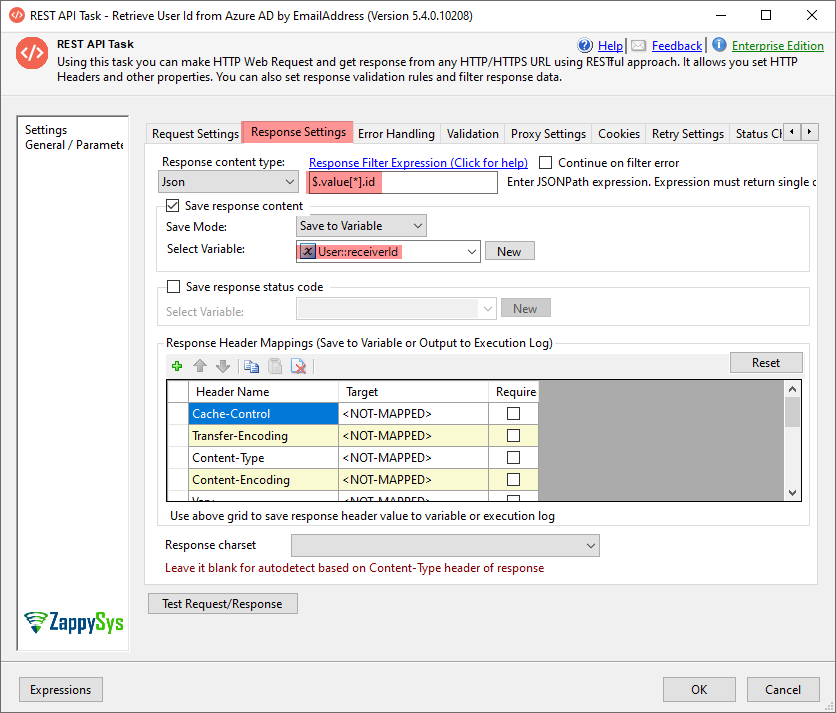
- Configure Response Settings:
- Response Content Type: JSON
- Response Filter Expression:
$.value[*].id - Save Response Content: Checked
- Save Mode: Save to Variable
- Select Variable: Create an SSIS string variable, e.g.,
receiverId.
Below is the sample screenshot of the REST API Task:
Request Settings Tab:
Response Settings Tab:
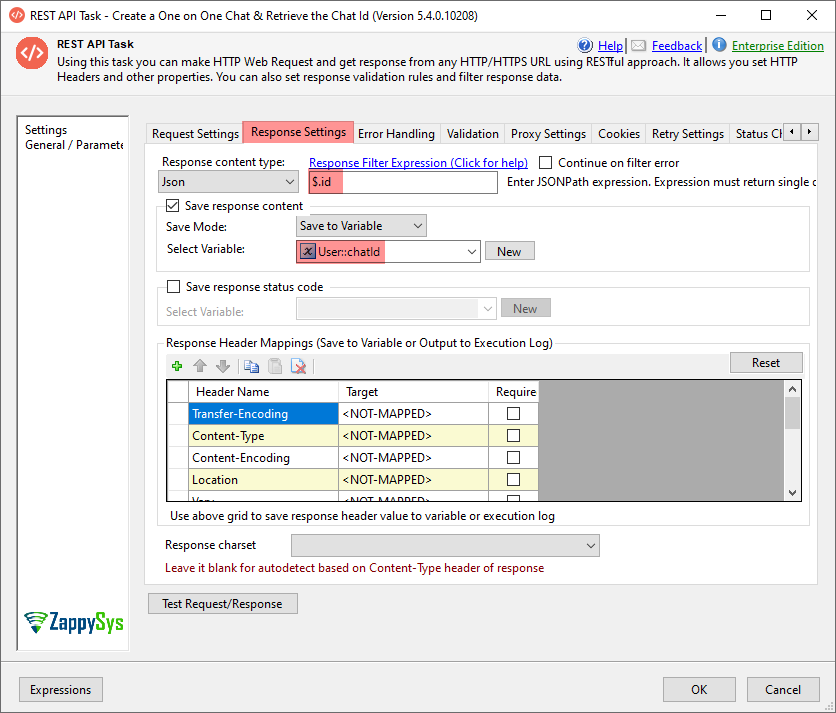
Step 2: Create a One on One Chat & Retrieve the Chat ID
- Set up REST API Task:
- Request URL Access Mode: Url from Connection
- Select Url Connection: Choose your configured OAuth connection.
- Request URL:
https://graph.microsoft.com/v1.0/chats - HTTP Request Method: POST
- Request Body:
{
    "chatType": "oneOnOne",
    "members": [
        {
            "@odata.type": "#microsoft.graph.aadUserConversationMember",
            "roles": ["owner"],
            "user@odata.bind": "https://graph.microsoft.com/v1.0/users('261e1130-f2c0-4fb1-856c-6c704a044807')"
        },
        {
            "@odata.type": "#microsoft.graph.aadUserConversationMember",
            "roles": ["owner"],
            "user@odata.bind": "https://graph.microsoft.com/v1.0/users('{{User::receiverId}}')"
        }
    ]
}
- Configure Response Settings:
- Response Content Type: JSON
- Response Filter Expression:
$.id - Save Response Content: Checked
- Save Mode: Save to Variable
- Select Variable: Create an SSIS string variable, e.g.,
chatId.
Below is the sample screenshot of the REST API Task:
Request Settings Tab:

Response Settings Tab:
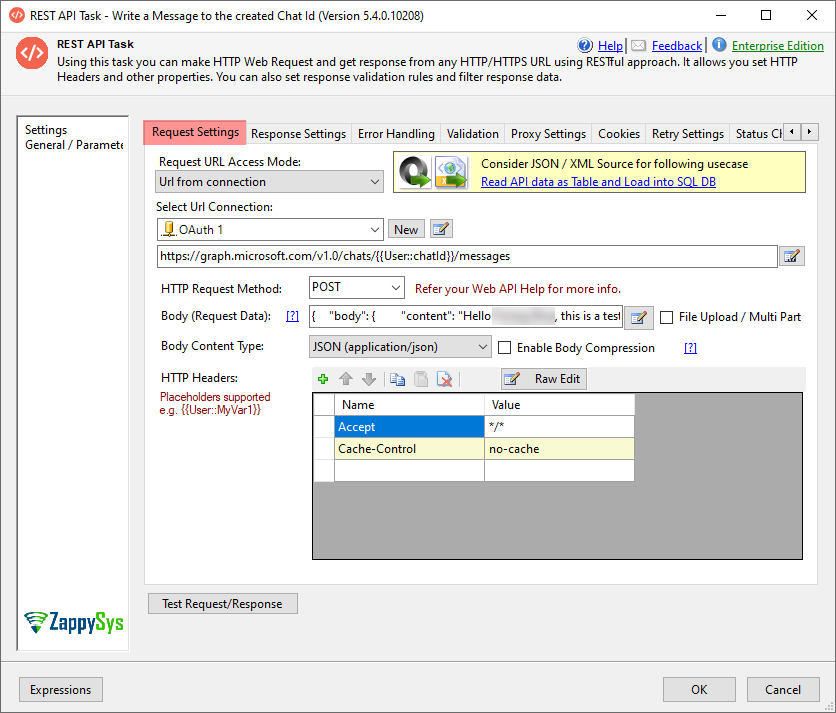
Step 3: Write a Message to the Created Chat ID
- Set up REST API Task:
- Request URL Access Mode: Url from Connection
- Select Url Connection: Choose your configured OAuth connection.
- Request URL:
https://graph.microsoft.com/v1.0/chats/{{User::chatId}}/messages - HTTP Request Method: POST
- Request Body:
{
    "body": {
        "content": "Hello Demo User, this is a test message from the app using the REST API TASK! on <<FUN_GETDATE>>"
    }
}
Below is the sample screenshot of the REST API Task:
Request Settings Tab:
Execution and Validation
Execute the SSIS package to send the One on One message on Teams. Validate the execution by checking the Teams chat where the message should appear.
Below is the sample screenshot of the SSIS Package Execution
Below is the sample screenshot of the Teams One-on-One Message

Send a Message on the Teams Channel:
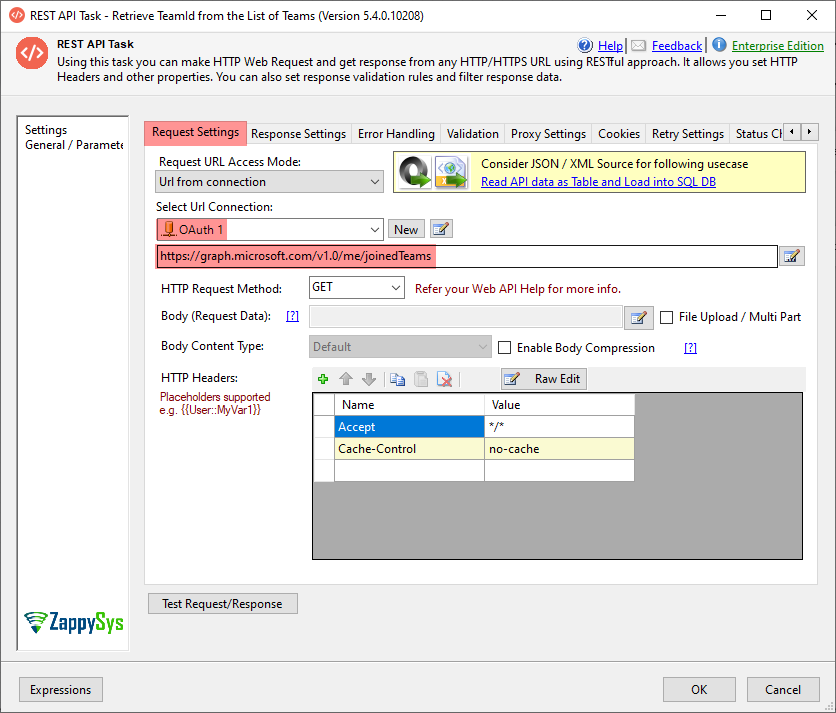
Step 1: Retrieve Team ID from the list of Teams
Drag-and-drop the REST API Task from the SSIS Toolbox and double-click on it to configure the properties.
- Set up REST API Task:
- Request URL Access Mode: Url from Connection
- Select Url Connection: Choose your configured OAuth connection.
- Request URL:
https://graph.microsoft.com/v1.0/me/joinedTeams - HTTP Request Method: GET
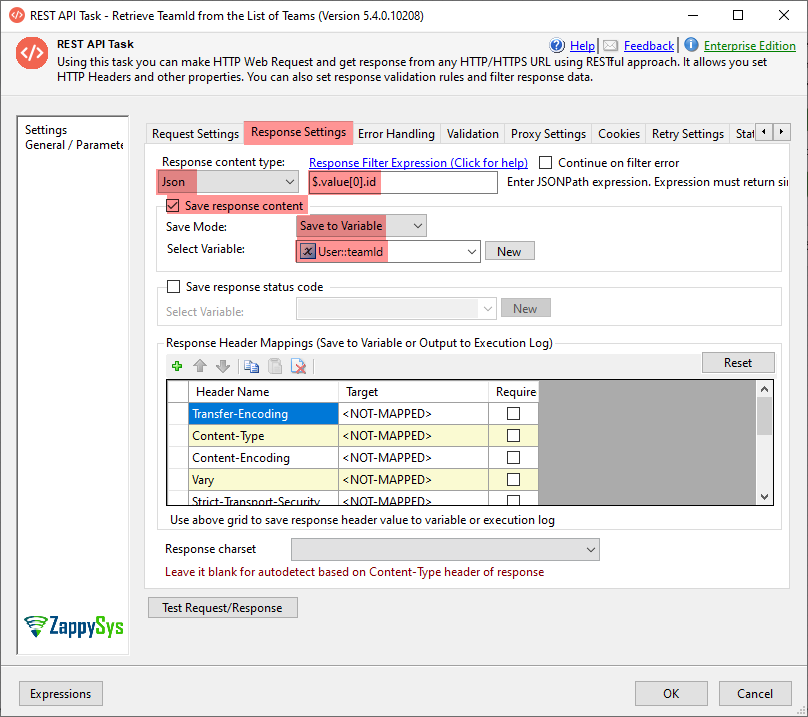
- Configure Response Settings:
- Response Content Type: JSON
- Response Filter Expression:
$.value[0].id - Save Response Content: Checked
- Save Mode: Save to Variable
- Select Variable: Create an SSIS string variable, e.g.,
teamId.
Below is the sample screenshot of the REST API Task:
Request Settings Tab:
Response Settings Tab:
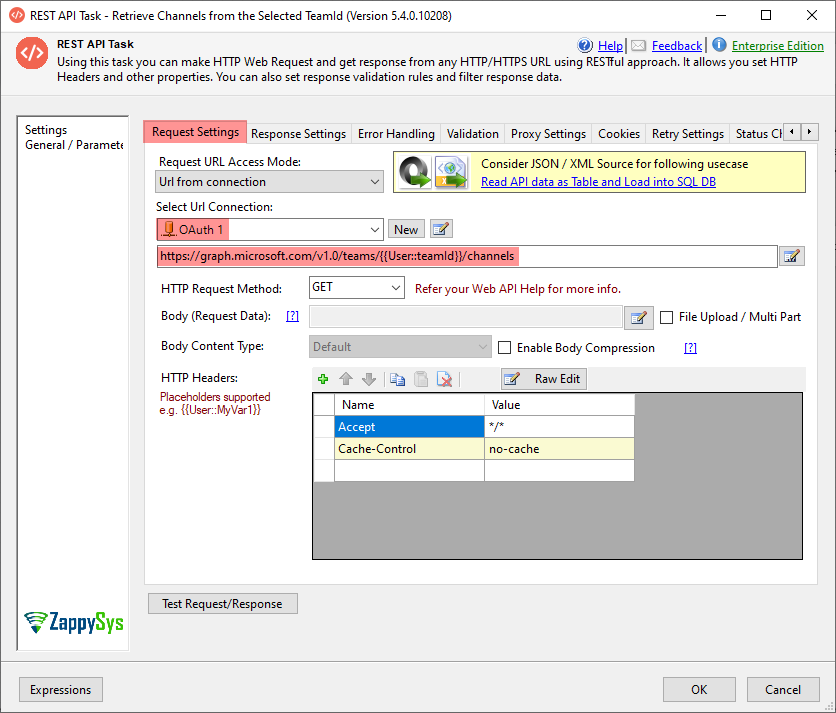
Step 2: Retrieve Channels from the Selected TeamId
- Set up REST API Task:
- Request URL Access Mode: Url from Connection
- Select Url Connection: Choose your configured OAuth connection.
- Request URL:
https://graph.microsoft.com/v1.0/teams/{{User::teamId}}/channels - HTTP Request Method: GET
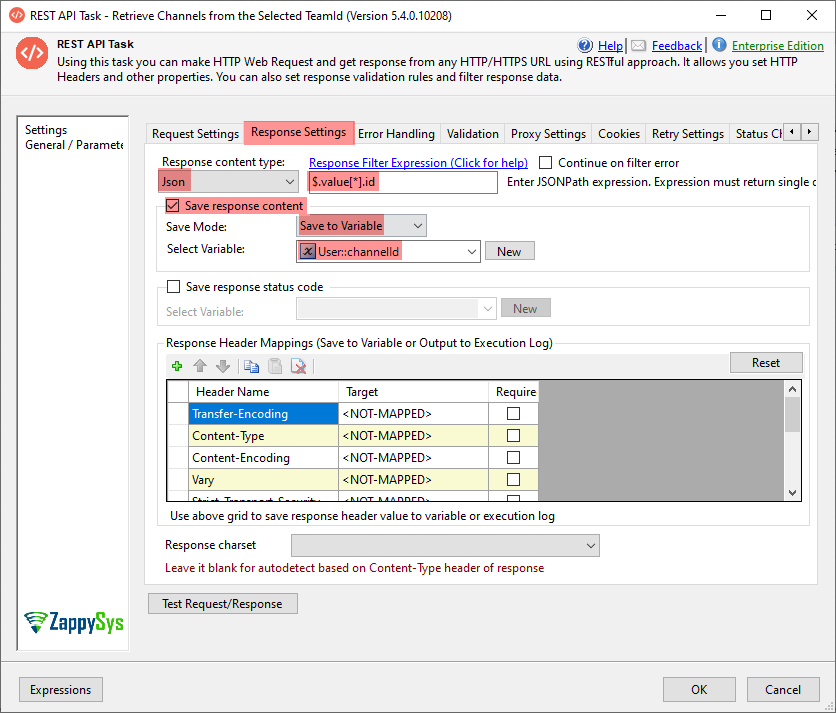
- Configure Response Settings:
- Response Content Type: JSON
- Response Filter Expression:
$.value[*].id - Save Response Content: Checked
- Save Mode: Save to Variable
- Select Variable: Create an SSIS string variable, e.g.,
channelId.
Below is the sample screenshot of the REST API Task:
Request Settings Tab:
Response Settings Tab:
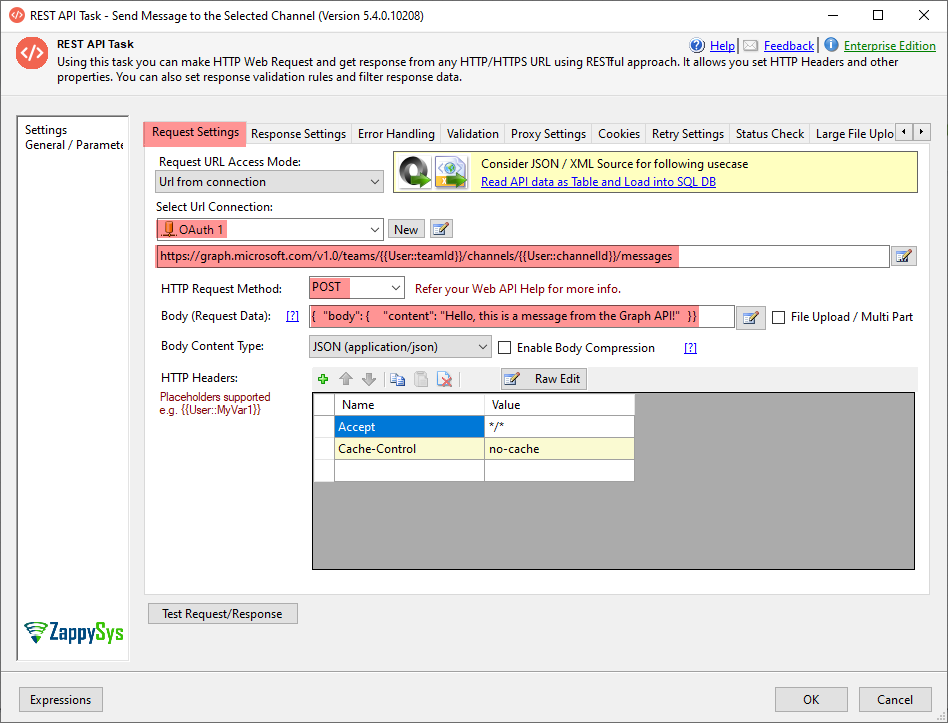
Step 3: Send a Message to the Selected Channel
- Set up REST API Task:
- Request URL Access Mode: Url from Connection
- Select Url Connection: Choose your configured OAuth connection.
- Request URL:
https://graph.microsoft.com/v1.0/teams/{{User::teamId}}/channels/{{User::channelId}}/messages - HTTP Request Method: POST
- Request Body:
{
    "body": {
        "content": "Hello Team, this is a test message from the app using the REST API TASK! on <<FUN_GETDATE>>"
    }
}
Below is the sample screenshot of the REST API Task:
Request Settings Tab:
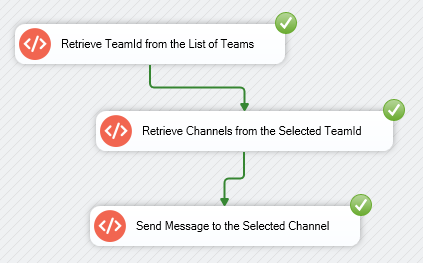
Execution and Validation
Execute the SSIS package to send the message on the Teams channel. Validate the execution by checking the Teams chat where the message should appear.
Below is the sample screenshot of the SSIS Package Execution
Below is the sample screenshot of the Teams Channel Message

Conclusion
Integrating Microsoft Teams with SSIS using Microsoft Graph APIs allows you to automate communication tasks efficiently. By following these steps, you can send One-on-one messages & send messages on Teams Channel directly from your SSIS packages, enhancing collaboration and workflow automation within your organization.
This article provides a structured approach to leveraging SSIS and Microsoft Graph APIs for Teams integration, empowering you to build robust automation solutions tailored to your business needs.