Introduction
In this article, we’ll walk you through the process of connecting to SharePoint Online Excel using the ZappySys connector within SSIS. This integration allows you to seamlessly retrieve and manage your SharePoint data, making it easier to incorporate into your workflows and applications. By following these steps, you’ll be able to efficiently extract and process data with our SharePoint connector, which is part of the ZappySys SSIS PowerPack.
Prerequisites
- Download and install the ZappySys SSIS PowerPack
- Microsoft account
Steps
Step 1: Register an Application in Microsoft Azure
To authenticate and access SharePoint Online, you need to register an application in Azure Active Directory.
-
Log in to the Azure Portal and go to Azure Active Directory.
-
In the left menu, click on App registrations.
-
Click New registration and enter a name for your application.
-
Choose the supported account type and set the Redirect URI to:
https://login.microsoftonline.com/common/oauth2/nativeclient -
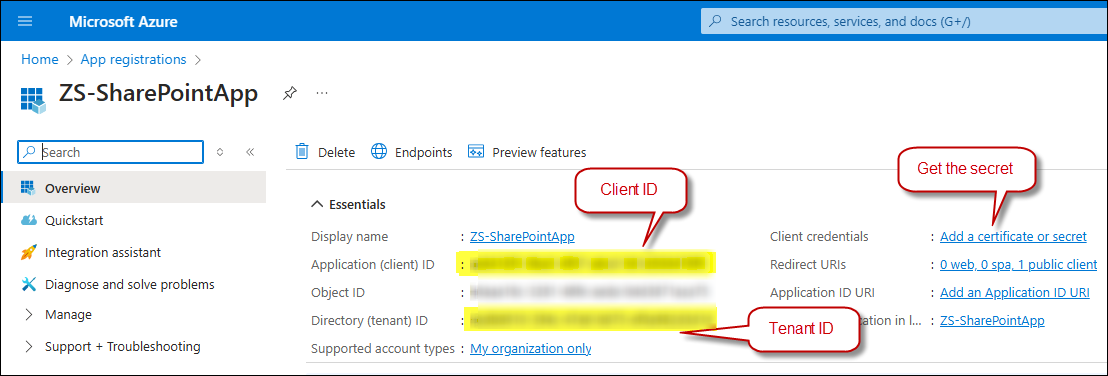
Once the app is created, copy the following credentials from the app configuration: Client ID, Tenant ID, and Secret ID
Step 2: Connect to SharePoint in SSIS
-
Add a Data Flow task to your SSIS package.
-
Drag and drop an API Source component inside the Data Flow.
-
Create a new connection and select the SharePoint Online connector. Click Next to proceed.
-
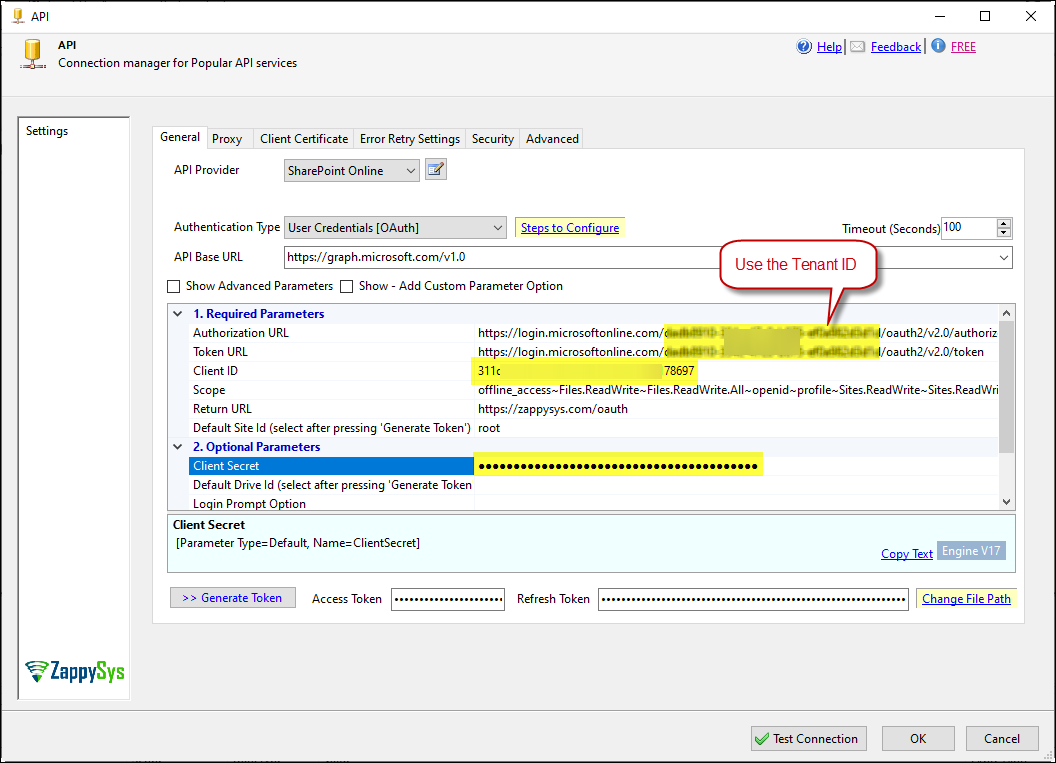
Fill in the required fields with your credentials: Client ID, Client Secret, and Authorization and Token URLs. Use the following URLs based on your Tenant ID:
- Authorization URL:
https://login.microsoftonline.com/{TenantID}/oauth2/v2.0/authorize - Authorization URL (Without TenantID):
https://login.microsoftonline.com/common/oauth2/v2.0/authorize - Token URL:
https://login.microsoftonline.com/{TenantID}/oauth2/v2.0/token - Token URL (Without TenantID):
https://login.microsoftonline.com/common/oauth2/v2.0/token
- Authorization URL:
-
Generate the token and save the configuration.
-
Select a table/endpoint, Read Excel Worksheet, fill the required fields and preview the data.

Considerations
- Store credentials securely for future use.
- Ensure the permissions assigned to the registered application allow access to SharePoint data.
Video Tutorial
Watch this tutorial for a step-by-step walkthrough:

Conclusion
By following these steps, you can easily integrate SharePoint Online Excel into SSIS using the ZappySys connector. This setup streamlines data retrieval and enhances automation, improving your workflow efficiency.
To get started, download and install the ZappySys SSIS PowerPack. If you encounter any challenges, review your configuration settings and error logs. For additional assistance, contact ZappySys Support.
For more advanced SSIS file operations, explore the ZappySys SSIS PowerPack.
References
Contact us
If you encounter any challenges or have specific use cases, please contact our support team via chat or ticket.