To create a fixed-width CSV file from the data from the specified SQL table or query, you can proceed with the following steps using the ZappySys Export CSV Task within SQL Server Integration Services (SSIS):
Let’s imagine there’s a table called tblOrders, structured like this:
| OrderID | CustomerID | OrderDate | OrderAmount |
|---|---|---|---|
| 10248 | VINET | Jul 4 1996 12:00AM | 61782028.6549 |
| 10249 | TOMSP | Jul 5 1996 12:00AM | 79244359.1802 |
| 10250 | HANAR | Jul 8 1996 12:00AM | 93616284.6321 |
| 10251 | VICTE | Jul 8 1996 12:00AM | 81884654.2694 |
| 10252 | SUPRD | Jul 9 1996 12:00AM | 72768824.6252 |
In this article we’re aiming to set up fixed-width columns with a ~ (tilde) delimiter to simplify the exporting of data to CSV format. Typically, CSV files are comma-separated, but in this case, we’re customizing it by using the tilde (~) character as the delimiter to tailor the format according to our needs.
To export CSV data with fixed-width formatting, the output columns data types need to be converted to CHAR using the CAST function within the query. You can simplify the process by creating a view, which also offers the option to hide the underlying query. like CAST([OrderID] AS CHAR(10)) as "OrderID"
SELECT Cast([OrderID] as char(10)) 'OrderID'
      ,Cast([CustomerID] as char(15)) 'CustomerID'
      ,Cast([OrderDate] as char(30)) 'OrderDate'
      ,Cast([OrderAmount] as char(20)) 'OrderAmount'
FROM [dbo].[tblOrders]
The expression CAST([OrderID] AS CHAR(10)) converts the [OrderID] column into a text string that is exactly 10 characters long. If the original [OrderID] is shorter than 10 characters, spaces will be added to the end to make it 10 characters long. If it’s longer than 10 characters, it will be trimmed to fit within the 10-character limit. You can adjust the length as per your preferences.
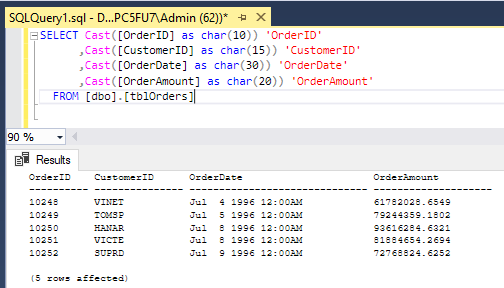
In SQL Server, when you switch to text mode (by pressing Ctrl + T ), the output will be displayed in a tabular format without grid lines. Each column’s width will be adjusted dynamically based on the length of the data. Here’s how the output might look:
Let’s proceed to configure the provided query within the Export CSV Task.
Below, we’ll outline the steps for loading data from a SQL Server source into a fixed-width CSV file.
-
To begin, ensure you have downloaded and installed the SSIS ZappySys PowerPack.
-
Once that’s done, open Visual Studio and create a new SSIS Package Project.
-
Then, within Visual Studio, drag and drop the ZS Export CSV Task onto the design panel.
-
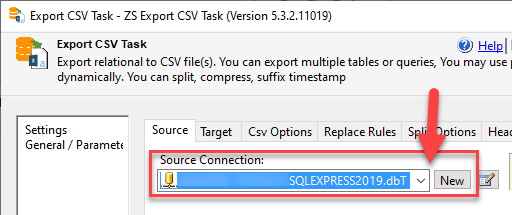
Create a new OLEDB Connection by clicking the “New” button and then connect to your desired SQL Database. For more detailed steps, you can refer to the documentation provided here.
-
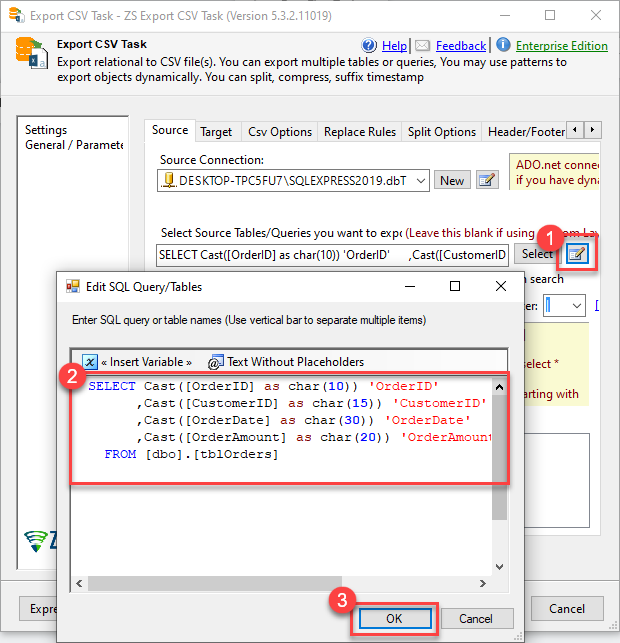
Let’s proceed to generate CSV files for selected tables/views. Click on the “Edit” button and set the queries for the data you want to export and click on OK.
In this example, we are using the following queries:SELECT Cast([OrderID] as char(10)) 'OrderID' ,Cast([CustomerID] as char(15)) 'CustomerID' ,Cast([OrderDate] as char(30)) 'OrderDate' ,Cast([OrderAmount] as char(20)) 'OrderAmount' FROM [dbo].[tblOrders] -
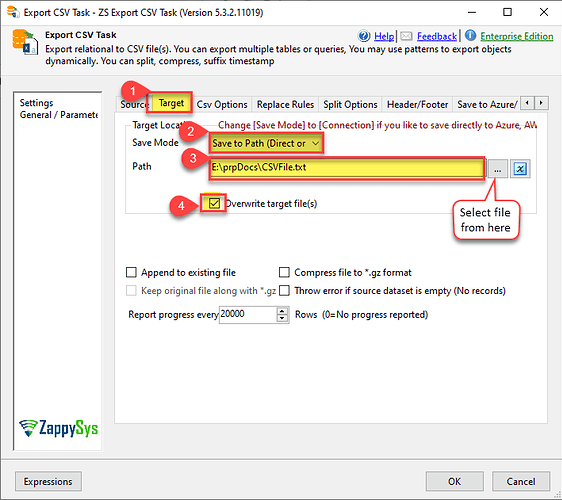
Now, set the target path and other options. Select the target location by browsing for it. Check the “Overwrite target file(s)” option if you want to overwrite existing files.
-
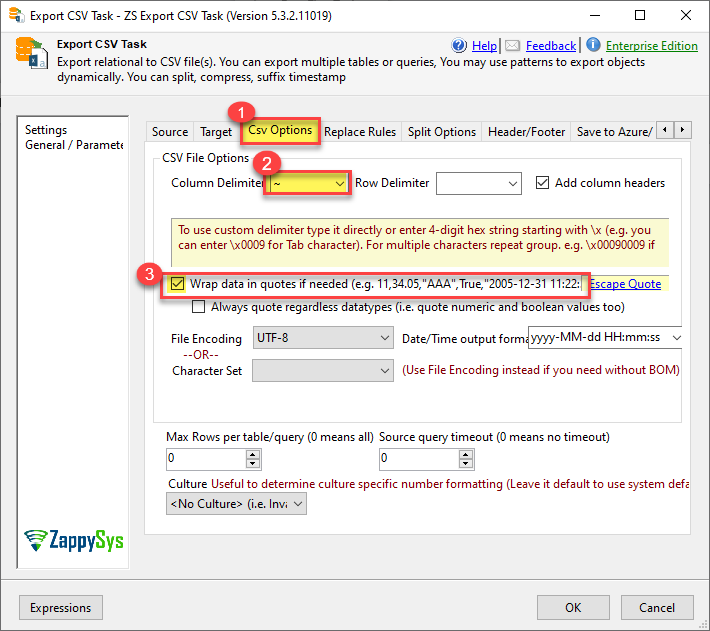
Navigate to the “CSV Options” tab and select your desired column delimiter. In this example, we’re using
~, but make sure to choose your preferred valid delimiter based on your preferences.
-
Click “OK” to save the settings for the Export CSV File Task.
-
That’s it! Run the package, and it will export the data to the fixed-width CSV or flat file according to the configurations you’ve set.
The output file will appear like this when opened in Notepad++ or Notepad:
But if you want the output to appear like this without being enclosed in double quotes:
To achieve that, navigate to the CSV Options Tab and ensure that the option “Wrap data in quotes if needed” is unchecked.
Related Links:
- SSIS Export CSV File Task
- SSIS Export Excel File Task
- SSIS Export JSON File Task
- SSIS Export XML File Task
Contact Us
If you encounter any challenges or have specific use cases, please contact our support team via chat or ticket.
