Introduction
This article guides you through connecting to the Shopify API in the ODBC API driver. This enables seamless integration and management of Shopify data using the ZappySys ODBC Shopify Connector.
Shopify is a leading e-commerce platform allowing businesses to create online stores. It provides robust tools to help users manage products, inventory, payments, shipping, and more. Companies can leverage advanced data integration and automation capabilities by connecting to the Shopify API through the ZappySys ODBC API driver.
Prerequisites
- ODBC PowerPack: Download and install the ZappySys ODBC PowerPack from the Customer Download Area or the trial version.
- Shopify Account
Steps
Create/Select an App from the Shopify Developers Page
-
Log into your Shopify store account.
-
Select the store to connect to with the ZappySys Shopify Connector after logging in.
-
Select the Settings link (usually in the lower-left corner) to launch the Settings screen.
-
On the left menu panel, select Apps and sales channels and then Develop apps for your store and finally, Create app.
-
Name the app, select the appropriate developer from the App developer drop-down, and then select Create app to save it.
-
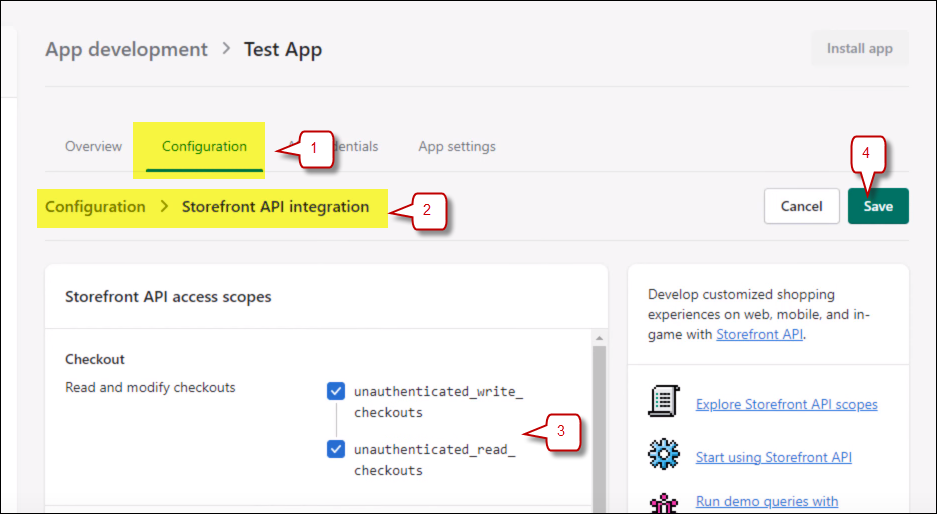
Select Configure Admin API scopes and the Admin API access scopes, then select every access scope checkbox that applies to your integration needs. It is generally not a good idea to allow more access than needed to fulfill your integration needs.
- To enable the reading of customer information, select read_customers.
- To enable the writing of customer information, select write_customers.
- To enable the reading of inventory item information, select read_inventory.
- To enable the writing of inventory item information, select write_inventory.
- To enable the reading of order information, select read_orders.
- To enable the writing of order information, select write_orders.
After selecting all applicable access scopes, select Save.
-
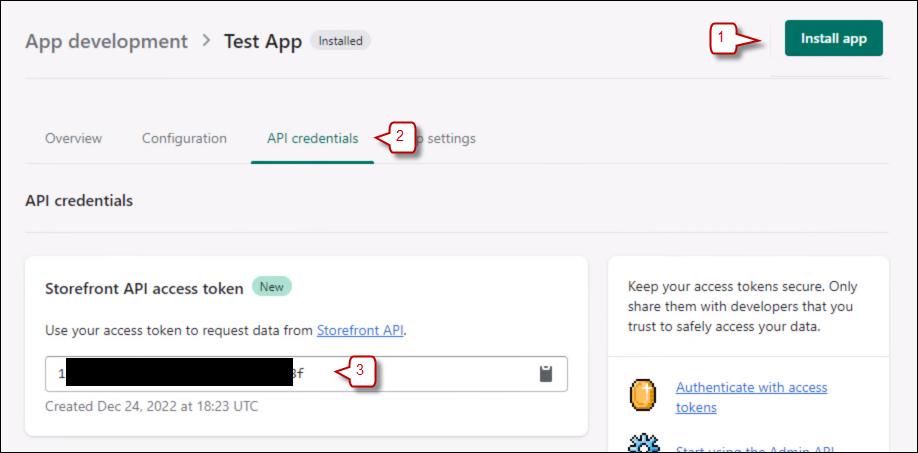
Install the app by selecting the Install app button (near the upper-right corner of the screen). If any other prompts for installation appear, select Install.
-
After installing the app, the Admin API access token will be available in the page’s API credentials tab. It can only be revealed ONCE for security purposes. Select Reveal token once to show the new Admin API access token. SAVE THE ADMIN API ACCESS TOKEN IN A SAFE PLACE WHERE YOU HAVE IT CONFIDENTIAL, SECURE, AND NOT ACCESSIBLE TO UNAUTHORIZED INDIVIDUALS.

Create a New Driver
-
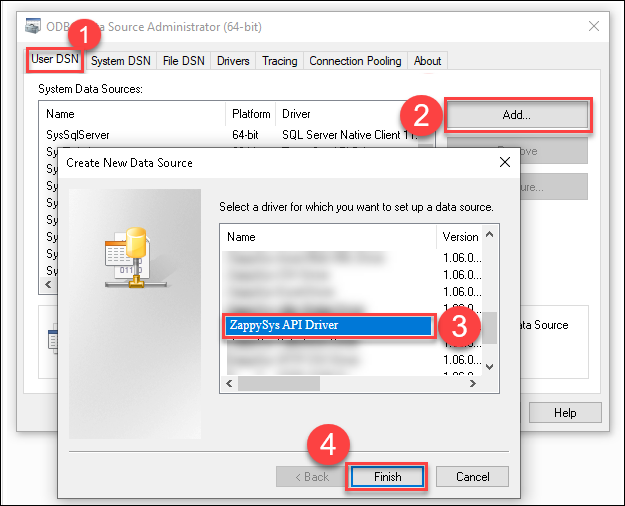
Open the ODBC Data Source by typing ODBC in the search box and launching the ODBC Data Source.
-
To gain access for yourself or other users, go to the User DSN or System DSN. Go to the System tab for SQL Server Integration and add a new System DSN. Click the “Add” button.
-
From the driver list, select ZappySys API Driver, then select Shopify in the connector list and press Continue.


Shopify Connector Configuration
-
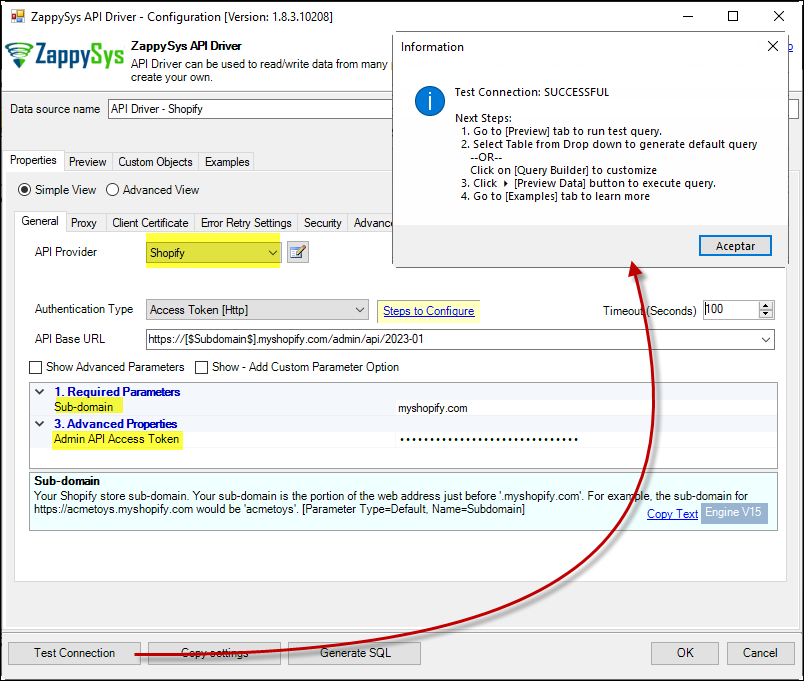
Enter the Sub-domain and the token in the Admin API Access Token field and test the connection.
Note: For example, the sub-domain forhttps://zappysys.myshopify.comwould be ‘zappysys’.
-
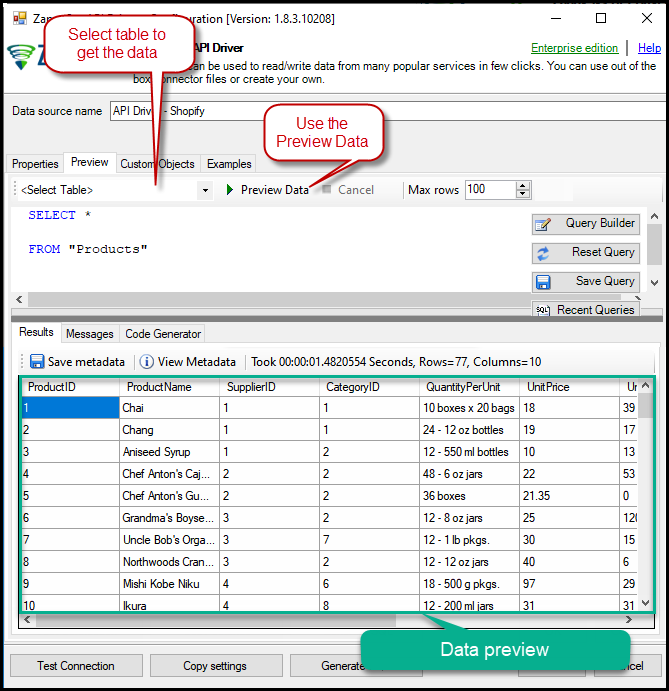
Go to the Preview Tab, select any table, and preview the result. Press OK to save the configuration.
Considerations
Save the credentials so you do not have to search for them in your account every time.
Video tutorial

Conclusion
Following these steps, you can seamlessly connect to Shopify within the ODBC API Driver, leveraging the ZappySys tool for efficient data retrieval and integration. For assistance or inquiries, contact our support team via chat on our website.
References
For more detailed information, refer to our ZappySys Shopify connector.