Introduction
This tutorial demonstrates how to convert an Excel file to PDF using Adobe PDF Services API in an SSIS package using ZappySys PowerPack components. This involves setting up an OAuth connection, uploading the file, converting it to PDF, and retrieving the converted document.
Prerequisite
-
Download and install the ZappySys SSIS PowerPack
-
Refer to Get Credentials for Authentication of Adobe PDF Services, follow Adobe PDF Services API documentation
Step-by-Step Guide
Let’s jump right in, step by step, as we learn how to create a PDF file from an Excel Sheet using Adobe APIs in SSIS.
-
Firstly, You need to Download and Install SSIS ZappySys PowerPack.
-
Once you have finished the first step, Open Visual Studio and create a New SSIS Package Project.
-
Now, follow the steps below to achieve our requirement.
Step 1: Create OAuth Connection
To authenticate with Adobe APIs, we need to establish an OAuth connection using the client credentials.
-
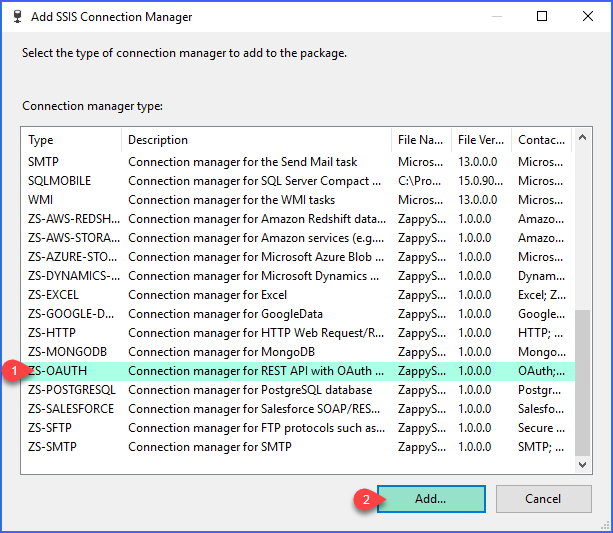
Right-click in the Connection Manager panel and click on New Connection
-
Select ZS-OAUTH Connection Manager from the Connection Managers list and click on the Add Button.
-
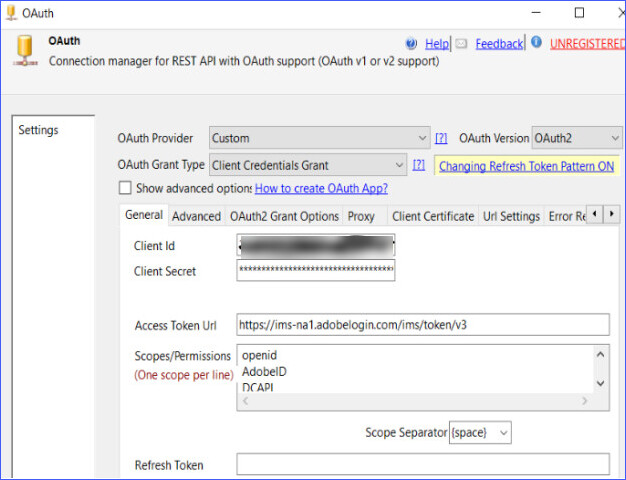
Configure new OAuth Connection for Adobe PDF Services as below, Set OAuth Provider to
Customand OAuth Version toOAuth2. -
Select Client Credentials Grant as the OAuth Grant Type.
-
Enter the Client ID and Client Secret.
-
Set the Access Token URL to
https://pdf-services.adobe.io/token. I’m usinghttps://ims-na1.adobelogin.com/ims/token/v3. -
Add the required Scopes/Permissions (e.g.,
openid,AdobeID,DCAPI). -
Save and test the connection.
-
Your OAuth connection is successfully configured, now let’s move on to the next step.

Step 2: Obtain Pre-Signed URL
Before uploading the Excel file, obtain a pre-signed URL from Adobe APIs.-
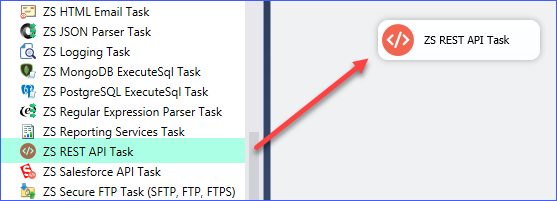
From the SSIS Toolbox, look for items starting with “ZS”. Drag and Drop [ZS Rest API Task] to Designer Surface.
-
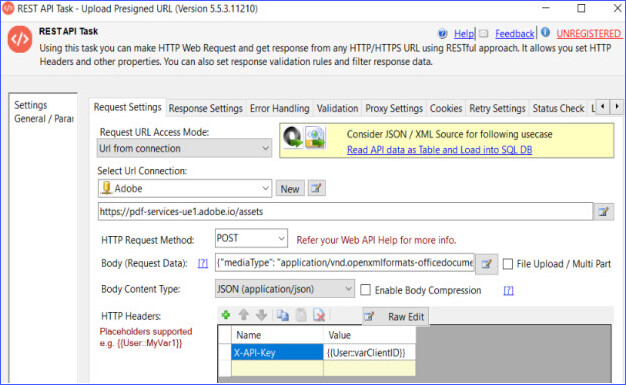
Configure the Request Settings tab Request URL Access Mode to
URL from connection. -
Select the Adobe OAuth connection created earlier.
-
Set the Request Method to
POST Method. -
In the Body (Request Data) section, specify the media type:
{"mediaType": "application/vnd.openxmlformats- officedocument.spreadsheetml.sheet"} -
In the Headers section, add
X-API-Keywith your Adobe API key.
-
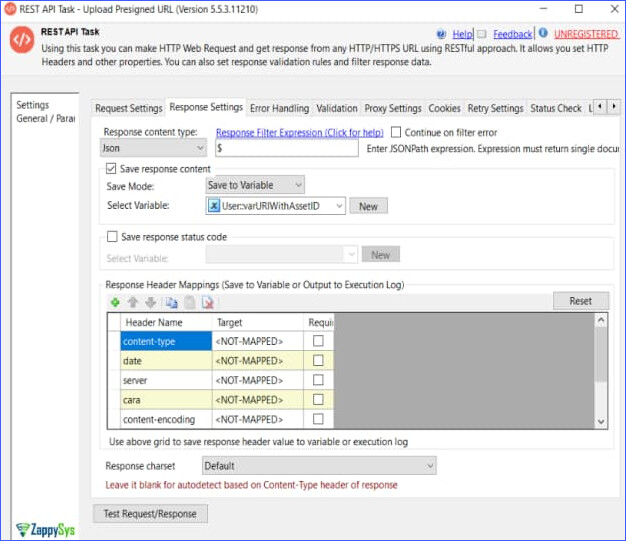
Now, configure the Response Settings tab to capture important information from the API response as below:
- Response content type: JSON
- Response Filter Expression: $
(This retrieves the entire JSON response) - Continue on filter error: unchecked
- Save Mode: Save to Variable
- Select Variable: User::varURIWithAssetID
(This captures the URL with the Asset ID returned by the API)
-
Execute the task to get the pre-signed URL.
-
The pre-signed URL has been successfully generated. Now, let’s move to the next step and use it to upload the Excel file.
Step 3: Configure JSON Parser Task to parse Response
-
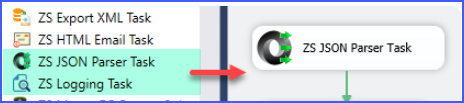
Drag and drop the ZS JSON Parser Task from the SSIS toolbox to the design panel.
-
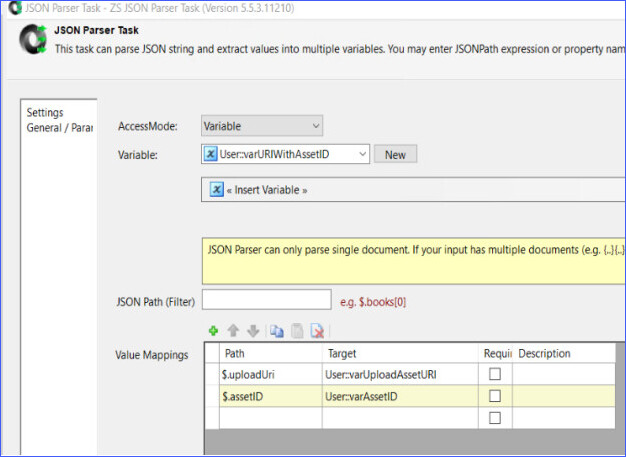
We need to configure the JSON Parser Task to parse the response JSON to fetch uploadUri & assetID from the Response. Parse the JSON Properties and set them to SSIS Variables as like below sample screenshot below.
-
The JSON response has been successfully parsed. Now, let’s move to uploading the Excel document using the pre-signed URL.
Step 4: Upload the Document using Pre-Signed URL
-
Add another ZS REST API Task from the SSIS toolbox to upload the Excel file.
-
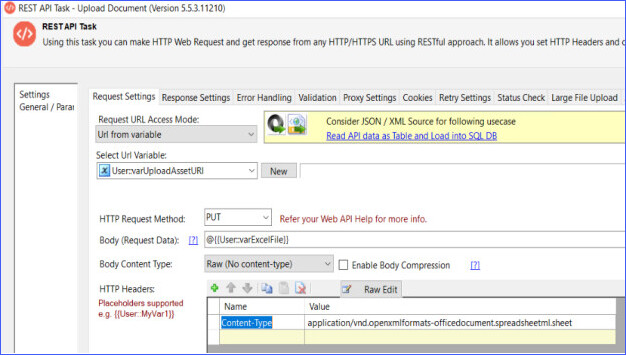
Configuring the Request Settings tab
-
Set the Request URL to the pre-signed URL obtained in Step 3.
-
Change the HTTP Method to
PUT. -
Enable File Upload/Multi-Part and specify the file path.
-
Set
Content-Type: application/vnd.openxmlformats-officedocument.spreadsheetml.sheet
-
Execute the task to upload the document.
-
Document uploaded successfully, let’s move to the PDF conversion step.
Step 5: Create PDF from the Uploaded File
-
Add another ZS REST API Task to send a conversion request.
-
Select URL Connection - Select your existing OAuth Connection Manager.
-
Configuring Request Settings tab: set the Request Method to
POST Method. -
Enter Request URL:
https://pdf-services.adobe.io/operation/createpdf -
In the Body (Request Data), specify:
{"assetID": "{uploaded_asset_id}", "targetFormat": "pdf"} -
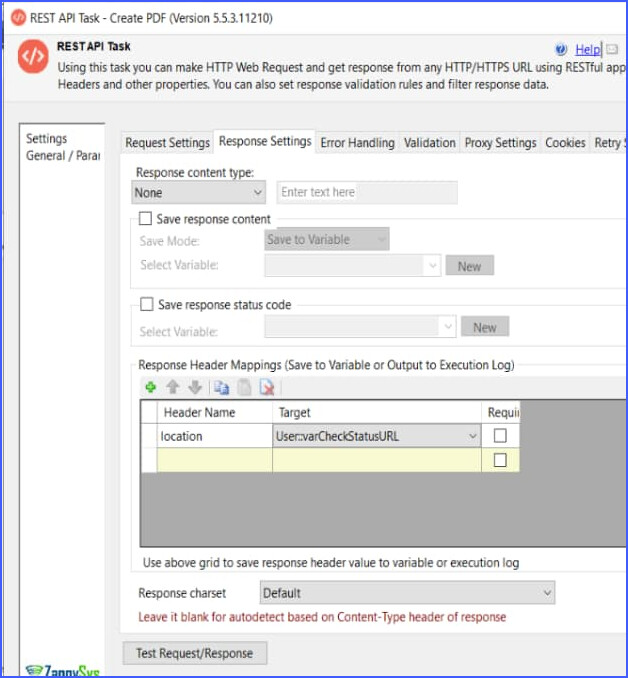
Configure Request Headers:
x-api-key:{{User:varClientID}} -
Configure Response Tab: Configure Response Headers Mappings to save the location header to the SSIS variable.
-
Execute the task and store the response, which includes a job ID.
-
Conversion request sent, now let’s check the status of the conversion.
Step 6: Check Status of Conversion
-
Add another ZS REST API Task to check the conversion status.
-
Configure Request Settings tab
-
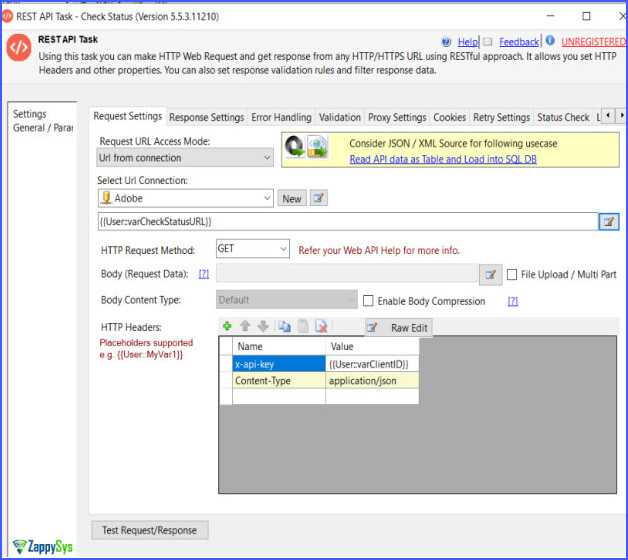
Select URL Connection - Select your existing OAuth Connection Manager
-
Set the Request Method to
GET. -
Use the job ID obtained in Step 4 in the request URL.
-
Configure Request Headers:
x-api-key:{{User:varClientID}}
-
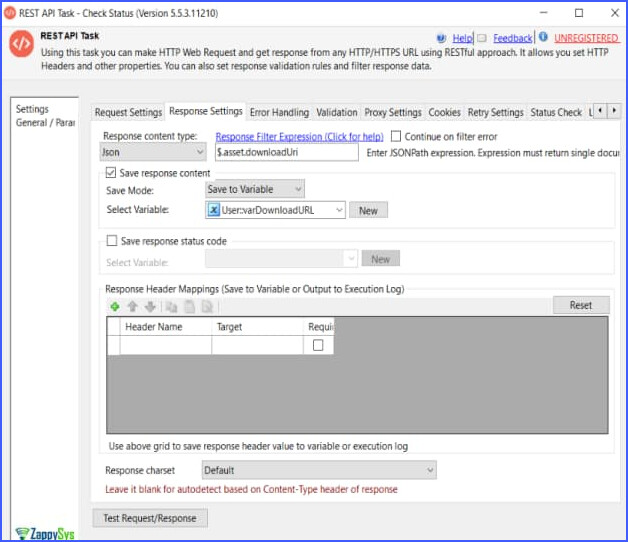
Configure the Response Settings tab as below:
- Response content type:
Json - Response Filter Expression:
$.asset.downloadUri
(This targets a specific property in the JSON to extract the download URL) - Save Mode:
Save to Variable - Select Variable:
User::varDownloadURL
(This stores the direct download URL returned by the API)
- Response content type:
-
Execute the task until the status indicates completion.
-
Once complete, we’re ready to download the final PDF file.
Step 7: Download the Converted PDF
-
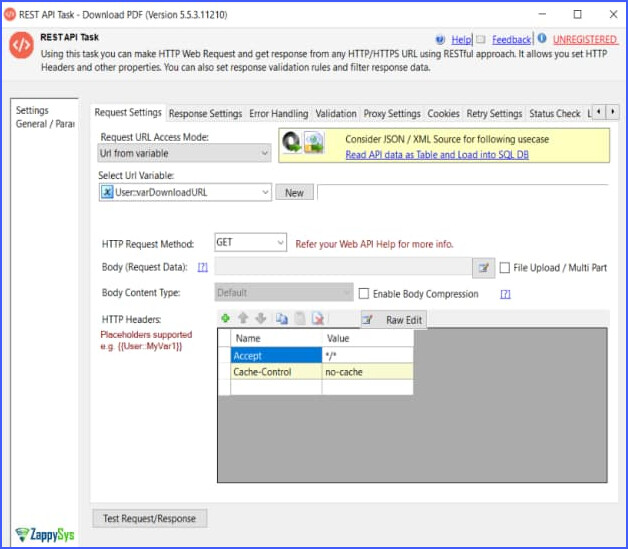
Add a final ZS REST API Task to download the converted PDF.
-
Configure Request Settings tab: Use the URL from the previous step and set the Request Method to
GET.
-
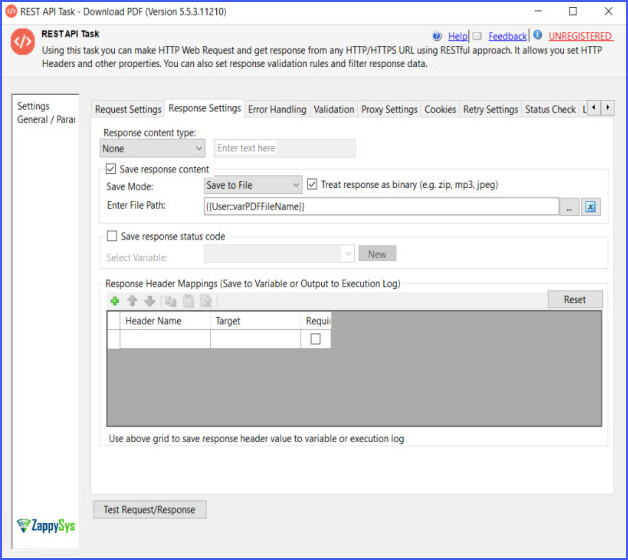
Configure Response Settings tab as below:
- Response content type:
None - Save Mode:
Save to File - Select Treat response as binary checkbox
- Enter File Path:
User::varPDFFileName
(This stores the file returned by the API physically to the folder path)
- Response content type:
-
Save the response to a file location.
-
At last, we’ve successfully completed the conversion of your Excel file to PDF using Adobe APIs in your SSIS package.
Conclusion
By following these steps, you can successfully convert an Excel sheet into a PDF using Adobe APIs in SSIS. This workflow automates the process and seamlessly integrates into your ETL workflows, saving time and ensuring efficiency.
For more API integrations, explore the full capabilities of the ZappySys SSIS Powerpack.
References
Adobe PDF Services API documentation
OAuth Connection Manager documentation
REST API Authentication with OAuth
REST API Web Service Task
JSON Parser Trasform
SSIS REST API Web Service Task – Blog Articles
SSIS Powerpack
Contact us
If you need further assistance or have specific use-cases, contact our support team via chat or by submitting a ticket.